Welcome to Moda Fabrics!
Building Blocks Baby Quilt
Building Blocks Baby Quilt
Published:
Jan 13 2015 - 23:00


Hi, I'm Cheryl from Meadow Mist Designs and I am so happy to be back at the Moda Bake Shop with another tutorial. This fun and easy baby quilt uses a single charm pack allowing you to use up some of the single charm packs hanging out in your sewing area. The quilt is constructed as a large court house steps block, having a center block and a number of borders. The center block is perfect for adding a personal touch such as a child's name or other motif using embroidery or applique.
![]()
1 Charm Pack (you will need 40 of the 42 charm squares) – Daysail by Bonnie and Camille. I used 2 charm packs so that I could leave out some of the fabric prints that were close in value to the background fabric.
2/3 yard Bella Solid in White
3/4 yard Print Fabric - Daysail Cape May Navy 5100 13
1/2 yard Binding Fabric - Daysail Stripe Red 55102 21
2 7/8 yards Backing Fabric (with 4” overhang)

![]()
Notes: Width of Fabric is abbreviated to WOF. The WOF is assumed to be at least 42”.
STEP 1 – CUTTING
Hint: To make the cutting of long strips easier, leave the fabric folded in half, divide the desired length by 2, and measure this calculated length from the fold. For example, if you wished to have a 25 1/2” long piece of fabric, you would measure and cut a piece 12 3/4” (25 1/2" divided by 2 ) from the fold.
White Fabric: (cut according to the directions and illustration)
Cut 1 strip 9 1/2” x WOF.
- Cut 1 square 9 1/2” x 9 1/2”. From the remainder of the strip cut 4 strips 1 1/2” x remainder of WOF.
- Sub-cut 2 strips each into 1 rectangle 1 1/2” x 25 1/2”. (for border 4)
- Sub-cut 2 strips each into 1 rectangle 1 1/2” x 27 1/2”. (for border 4)
Cut 6 strips 1 1/2” x WOF.
- Sub-cut 2 strips each into 1 rectangle 1 1/2” x 18 1/2” and 1 rectangle 1 1/2” x 20 1/2”. (for border 2)
- Sub-cut 2 strips each into 1 rectangle 1 1/2” x 36 1/2”. (for border 6)
- Sub-cut 2 strips each into 1 rectangle 1 1/2” x 38 1/2”. (for border 6)
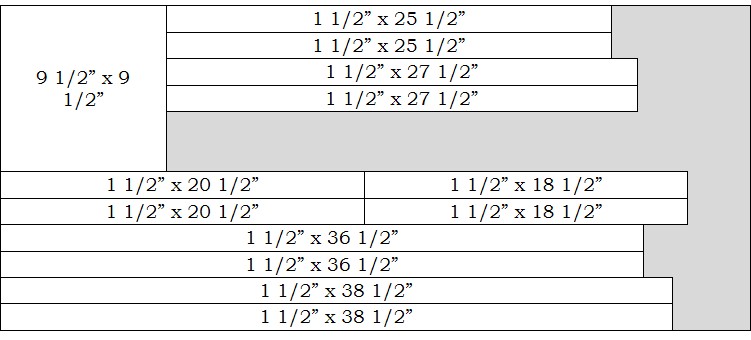
Print Fabric:
Cut 8 strips 3” x WOF.
- Sub-cut 2 strips each into 1 rectangle 3” x 20 1/2”. (for border 3)
- Sub-cut 2 strips each into 1 rectangle 3” x 25 1/2”. (for border 3)
- Sub-cut 2 strips each into 1 rectangle 3” x 38 1/2”, saving the remainder of the strips. (for border 7)
- Using the remaining 2 strips 3" x WOF, trim the selvages and attach the remainder of a previously cut strip to each of 2 WOF strips (with selvages trimmed off). Trim each strip into 1 rectangle 3” x 43 1/2”. (for border 7)
Binding Fabric:
- Cut 5 strips 2 1/2" x WOF.
STEP 2 – QUILT TOP ASSEMBLY
Hints: I recommend pressing all border seams open within the quilt top to help keep seams straight and minimize any bowing of the seam line. I also recommend pinning all borders onto the quilt top, easing in any extra length on the border or quilt top to keep the quilt top square.
Each of the borders will be attached to the quilt top in the same manner.
- Layout the borders on all 4 sides of the quilt top.
- Pin and sew side borders onto quilt top, pressing seams open.
- Pin and sew top and bottom borders onto quilt top, pressing seams open.
Center Block
- The quilt begins with the 9 1/2" x 9 1/2" white square. You may add any optional personalization to the block such as a baby's name using embroidery or applique.
Border 1 – Charm square border
- Form Border 1 using a total of 12 charm squares. Create 2 side borders by sewing together 2 charm squares (5” x 9 1/2”) for each. Create 2 top and bottom borders by sewing together 4 charm squares (5” x 18 1/2”) for each.
- Attach the (5” x 9 1/2”) 2-charm side borders and the (5” x 18 1/2”) 4-charm top and bottom borders to the center block. After adding Border 1, the quilt top should measure 18 1/2” square.

Border 2 – Background border
- Attach the (1 1/2” x 18 1/2”) background pieces as the side borders and the (1 1/2” x 20 1/2”) background pieces as the top and bottom borders. After adding Border 2, the quilt top should measure 20 1/2” square.

Border 3 – Print border
- Attach the (3” x 20 1/2”) print pieces as the side borders and the (3” x 25 1/2”) print pieces as the top and bottom borders. After adding Border 3, the quilt top should measure 25 1/2” square.

Border 4 – Background border
- Attach the (1 1/2” x 25 1/2”) background pieces as the side borders and the (1 1/2” x 27 1/2”) background pieces as the top and bottom borders. After adding Border 4, the quilt top should measure 27 1/2” square.
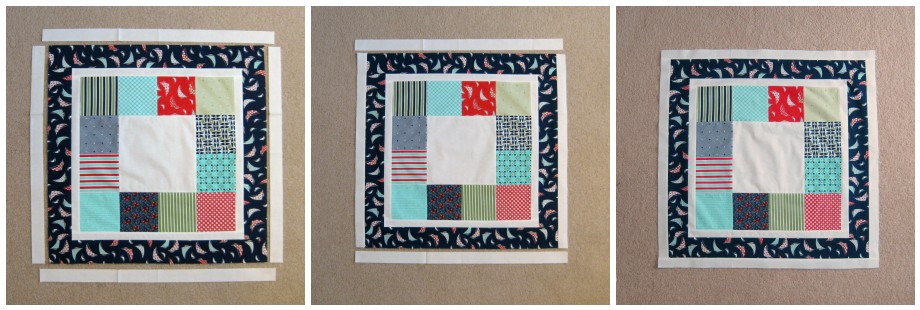
Border 5 – Charm square border
- Form Border 5 using a total of 28 charm squares. Create 2 side borders by sewing together 6 charm squares (5” x 27 1/2”) for each. Create 2 top and bottom borders by sewing together 8 charm squares (5” x 36 1/2”) for each.
- Attach the (5” x 27 1/2”) 6-charm side borders and the (5” x 36 1/2”) 8-charm top and bottom borders. After adding Border 1, the quilt top should measure 36 1/2” square.

Border 6 – Background border
- Attach the (1 1/2” x 36 1/2”) background pieces as the side borders and the (1 1/2” x 38 1/2”) background pieces as the top and bottom borders. After adding Border 6, the quilt top should measure 38 1/2” square.

Border 7 – Print border
- Attach the (3” x 38 1/2”) print pieces as the side borders and the (3” x 43 1/2”) print pieces as the top and bottom borders. After adding Border 7, the quilt top should measure 43 1/2” square.

STEP 3 – FINISHING THE QUILT
More detailed information about quilt finishing techniques can be found in the Moda Bake Shop Basics posts.
- Make the quilt backing: Cut the backing fabric into 2 pieces (51” x WOF) and sew the pieces together along their selvage edges. Trim to approximately 51” x 51”. Layer the quilt top, batting, and backing.
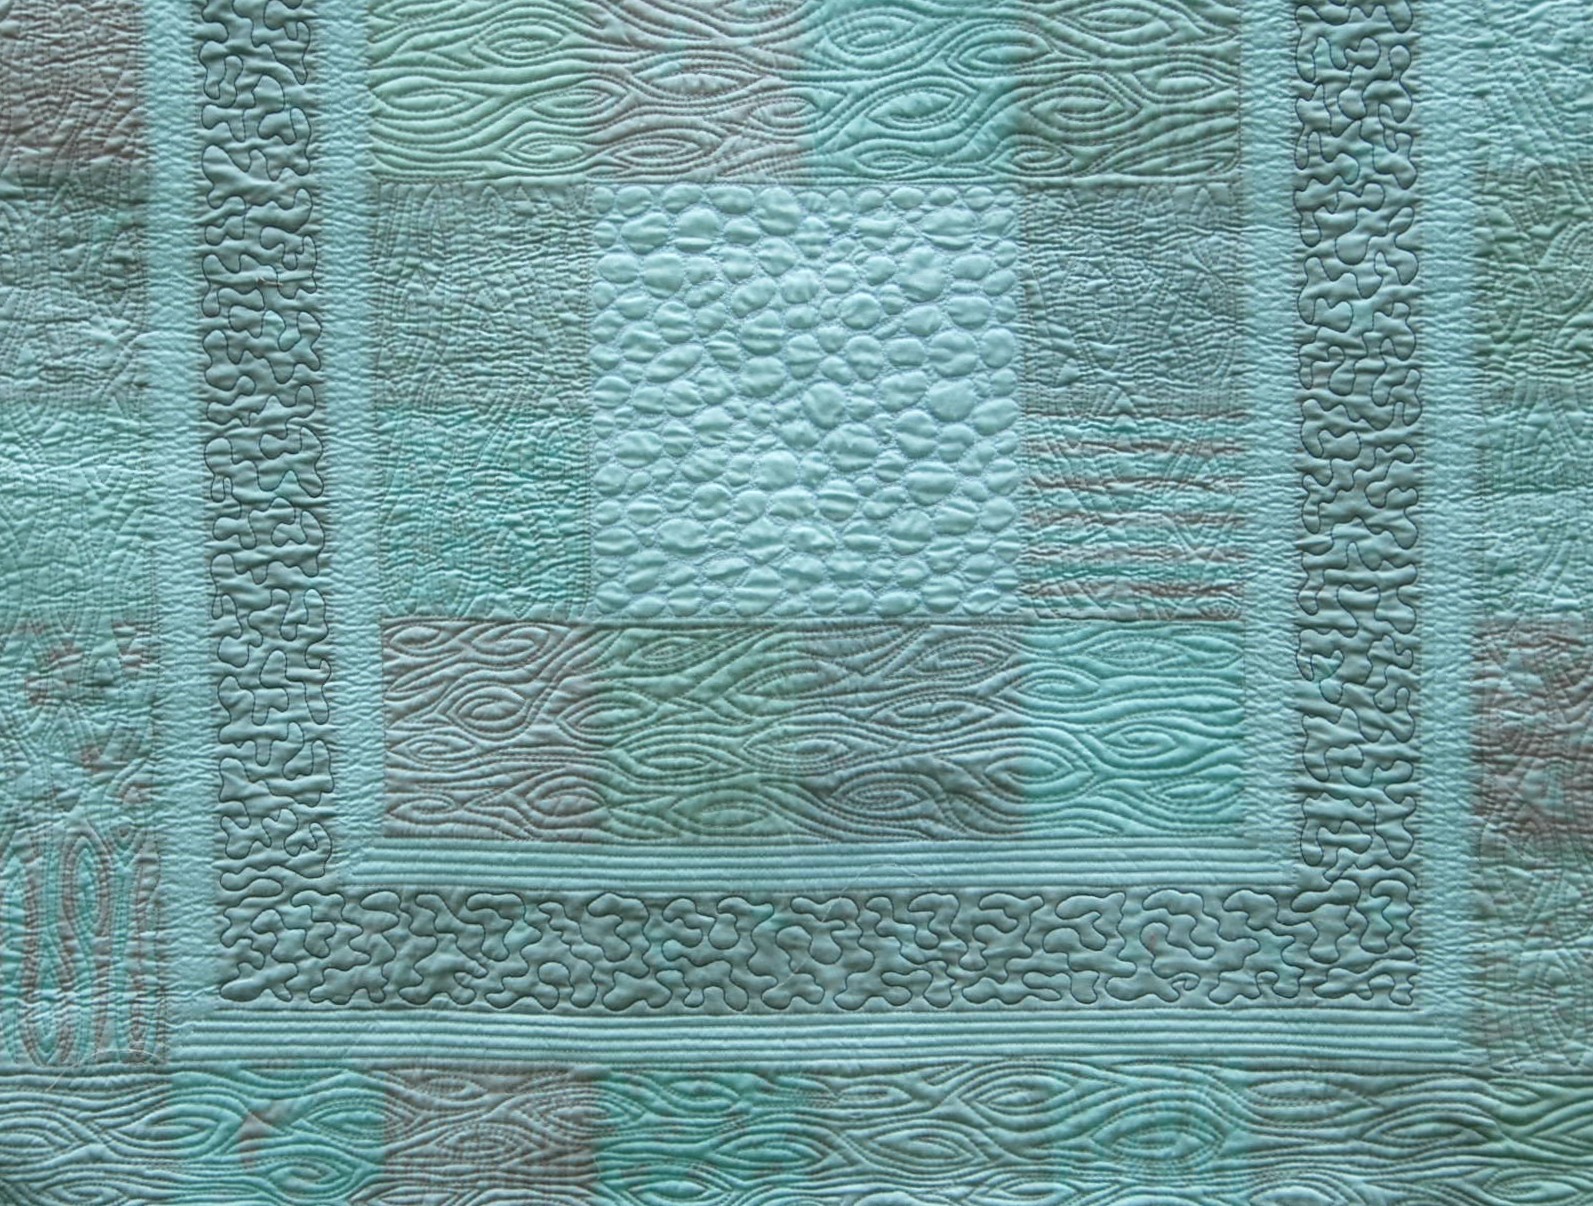
- Baste and quilt as desired. In my version of Building Blocks, I quilted the center block using a pebble pattern in white thread, the background borders (borders 2, 4, and 6) using straight lines in white thread, the charm square borders (borders 1 and 5) using a wood grain pattern in a light gray thread, and the print borders (borders 3 and 7) a meandering pattern using a dark blue thread.
- Form the binding from 5 strips 2½” x WOF. Bind and enjoy your quilt :)

![]()
A fun 43" x 43" baby quilt!

Cheryl Brickey
Happy Quilting!
![]()
Posted in: