Welcome to Moda Fabrics!
Old Fashioned Windmill Quilt
Old Fashioned Windmill Quilt
Published:
Sep 3 2016 - 23:00


Hi! I'm Elisabeth DeMoo and this is my second time here at the Moda Bake Shop. It might be my Dutch heritage, but I just love windmills! This is my take on the old fashioned windmill and the newer high-tech windmill. It is a two-part series. Today we will be creating the old fashioned block (& lap quilt) but come back on September 6th and turn your scraps into another lap quilt; or if you would like, save all your blocks to make one large quilt. I used Acreage by Shannon Gillman Orr. Isn’t it beautiful? I just love the colors. Perfect for an end-of-summer quilt. Designed into the fabric you will find scenes from summer days filled with biking, gingham picnic table cloths, clothespins, and fields of flowers. This quilt finishes at 51.75" x 51.75". Here is a breakdown of the quilt.
![]()

Acreage Layer Cake® by Shannon Gillman Orr
Bella Solid White Layer Cake® (background fabric)
Print Out - Marking & Pinning (download and print)
Painter Tape
Disappearing Fabric Marker or Chalk Pencil
Colored Pencil
![]()
- Locate your “Marking & Pinning” printout. Use the Horizontal Guide & the Vertical Guide as the reference, line them up with the lines on your cutting mat, toward the middle of mat. Tape it down. If the printer cut off some of the printout, place the ruler on top of your marking line, draw a line over it with the pencil extending the marking line.
- Align a colored 10” square to the top right corner of the printout RSD. Line up the ruler on the marking line. Draw a line with your disappearing fabric marker. Do this to all of your colored 10” squares. (basically 1” in on the bottom and 2.5” in on the top on the right edge of square)
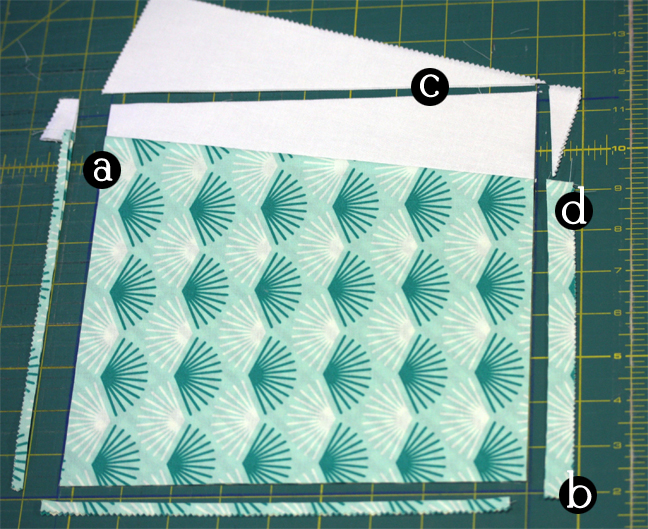
- Align a white 10” square to the top right corner of the printout RSU. Place the ruler on top of 5” of the right side of the white square. Line up a printed 10” square RSD to the left edge of the ruler and the horizontal guide. The horizontal guide will set your printed square .5” above the white square. Use three pins to secure the two squares together. Refer to image. Do this to all of your 10” squares.

- Sew a .25” seam on both sides of the marker line. Do this to all of your pinned 10” square sets.
- On the cutting mat, place the ruler on top of your marker line. Cut. You will have a block A and a block B. Open and press flat all of block A’s and all of block B’s, pressing seems to the dark side. Keep all of the block B’s together for Day 2.

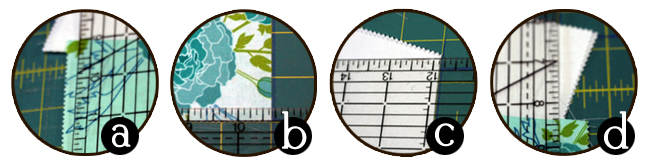
- Trim the block A’s down to 9.25” x 9.25”. It is best to do this step all at one time. Refer to images - I drew a 9.25” square on my cutting mat with color pencil, lined side A to the left edge making sure the fabric fully covered that edge (check to make sure that side D's edge is also fully covered). Then lined up side B with the bottom of the square. I cut on side D and on side A (using the mat line NOT pencil line as the guide). However I brought my ruler a quarter of an inch up from the top pencil line, side C and cut there. Bring the ruler a quarter of an inch up from the pencil line on side B and cutting there. Keeping the square 9.25".
- Locate two blocks of the same color. Line up the following edges together: a fully printed edge to the edge with a larger portion of white. Press flat. Make 18 half windmill blocks.


- Locate two half windmill blocks of the same color. Sew them together nesting seams. Press flat. Make six big windmill blocks.
- Sew three big windmill blocks together to make a row a windmills. Press flat. Repeat.
- Sew three half windmill blocks together to make a row a windmills. Press flat. Repeat.
-
 Sew your rows together. Keep the half windmill on the outer sides of the quilt top. Press flat.
![]()
This quilt finishes at 51.75" x 51.75". Quilt as desired and bind.
If you would like a larger quilt, add borders.
Elisabeth DeMoo
{brownbirddesignsquilts.com}
![]()
Posted in: