Warehouse Closed On July 4th
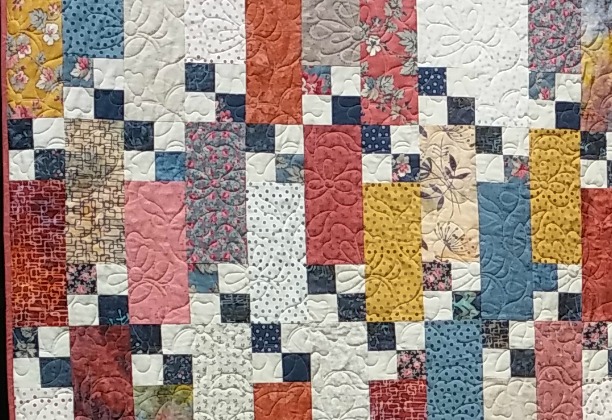
Bliss Quilt
Bliss Quilt
Published:
Apr 26 2017 - 23:00
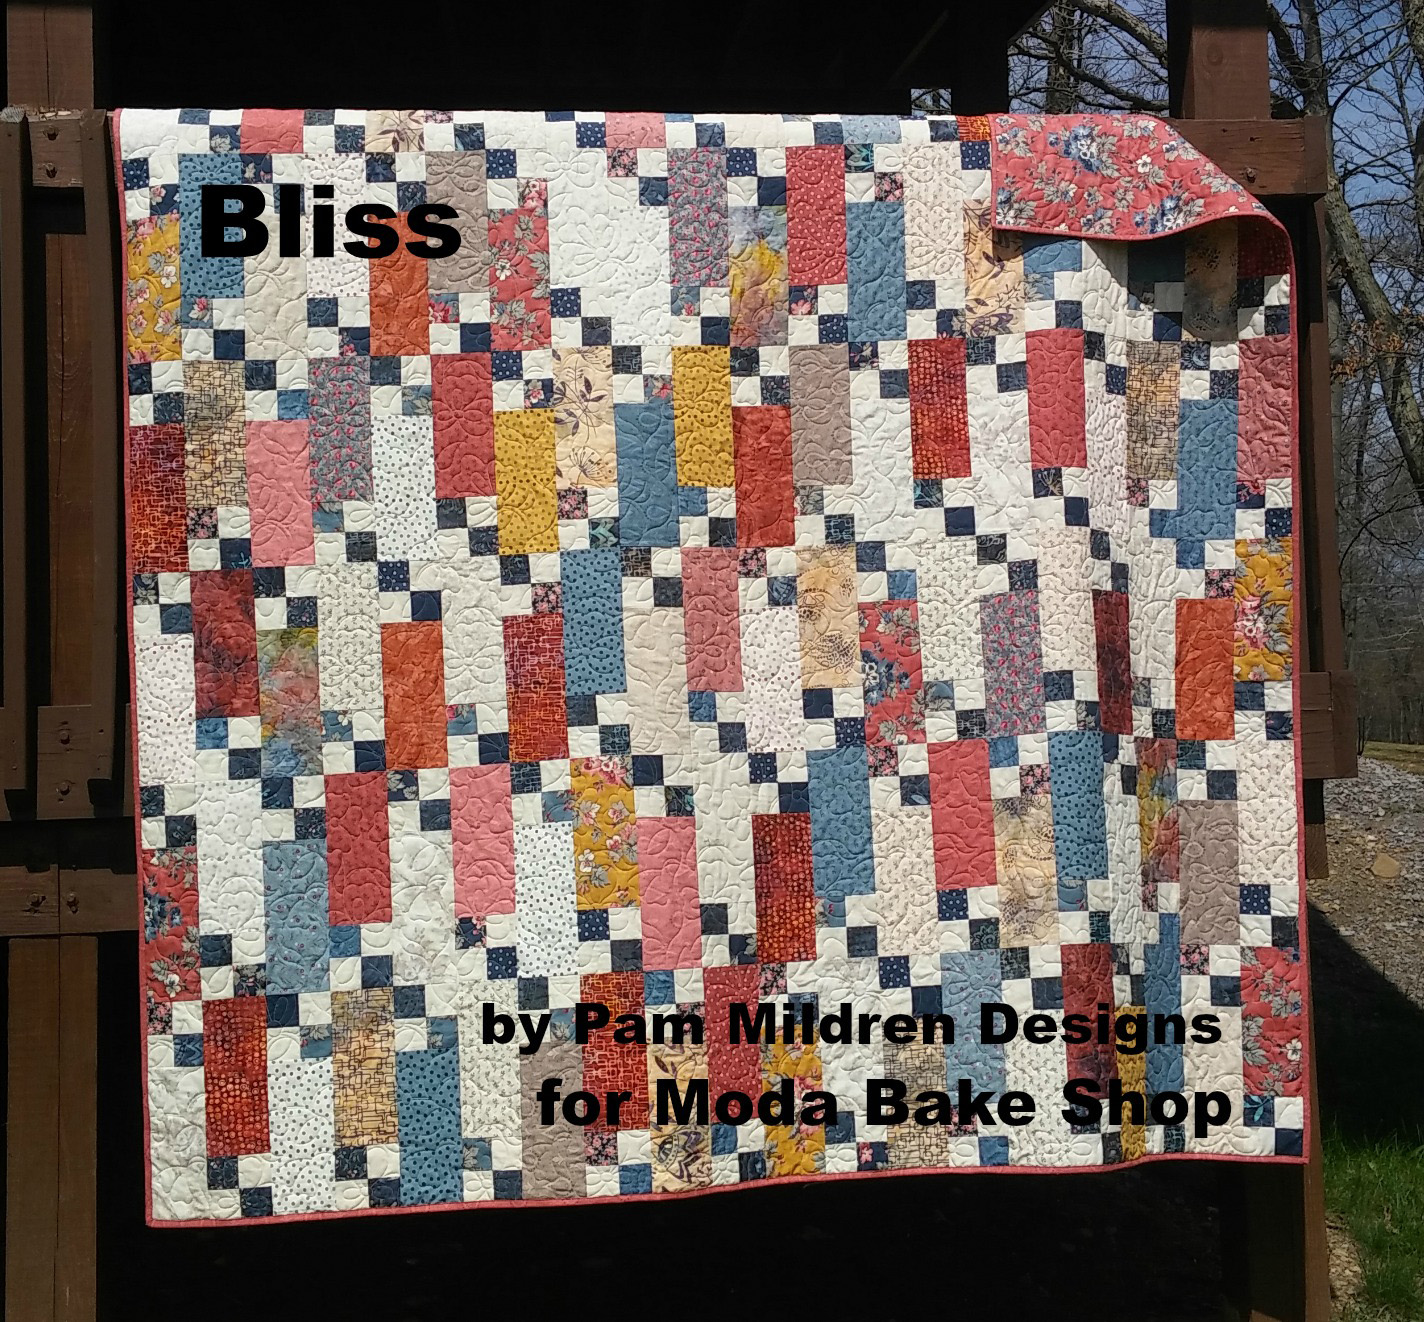

Bliss is a pattern I wrote last summer when I needed a wedding gift for my nephew, Lyndon and his wife-to-be, Catherine. It was a challenge to find patterns for Fat 8th bundles. I wanted something simple to piece and complete. I love to see many fabrics in a quilt so the bundles offer great variety. This is a quilt pattern which you can use all of the fabric in a bundle with very little waste. The size can be customized according to your needs and the size of your bundle.
This quilt finishes at 82" X 82.
![]()
For Bliss I used the Sweet Blend & Sweet Blend Batiks Fat 8th Bundles and yardage by Laundry Basket Quilts.
1 Fat Eighth Bundle of 42 fabric
1 1/2 yards background/neutral
6.0 yards backing fabric
2/3 yards binding fabric
![]()
Separate the fabric:
Select 30 Fat 8th’s for the rectangle units.
Select 12 Fat 8th’s for the 4-patch units. This fabric will be combined with the neutral fabric, so select a color that will provide contrast. In the picture you may note that I selected the dark blue fabric for all of my 4-patch units.
*If you have a fat 8th bundle with less than 42 fabrics, select a few coordinating fat quarters. Each Fat Quarter can be cut into 2 Fat 8th’s at 9” X 22”.
 Separate the fabric for the 4-patch blocks and the rectangle units.
Press the Fabric:
Keeping your 2 piles of fabric separate. Press all of the Fat 8th’s with a hot iron on a cotton setting to remove the folds and creases. Press the 1 1/2 Yard of neutral fabric as well. I like to use Best Press (or other starch alternative). Another tip, is to press the fabrics one on top of the other, lining up the bottom edge and left edges of the fabric. Then the fabric will be ready for cutting.
*I also use steam when pressing fabric. If you choose to use steam, be sure to lift the iron up and down in a pressing manner. Do not move the iron back and forth in all directions as you would iron a shirt, this will stretch the fabric.
Cutting the Fabric:
1. For the rectangle units, each of the 30 Fat 8th’s are cut into 4– 4 1/2” X 10” (120). This step can be streamlined by cutting multiple layers of fabric, maybe 4-6 at a time. To do this line up the left edge 22” and bottom edge 9” of the fat 8th’s on a rotary cutting mat. Sliver trim the left edge, and the bottom edge of the fabric. Then from the left edge cut a 4 1/2” X 22” strip twice, leaving them on the mat. Using the bottom edge measure up 10” and cut, and again 10” and cut. You now have 4—4 1/2” X 10” units per Fat 8th.

Cutting the rectangle units.
2. To cut the 12 Fat 8th’s for the 4-patch units, use the same layering method. Line up the left edge (22”) and bottom edge( 9”) of the Fat 8th’s on a rotary cutting mat. Sliver trim the left edge, and the bottom edge of the fabric. Now cut each of the Fat 8th’s into 3- 2 1/2” X 22” strips.
 Cut the Fat 8th's for the 4-patch units.
3. Take the 1 1/2 Yard of neutral fabric, line up the folded edge of the fabric on a line on the cutting mat. This time ONLY sliver trim the left edge. Leave the fold in place. Start cutting from the straightened edge, 19– 2 1/2” X 40” strips of fabric.
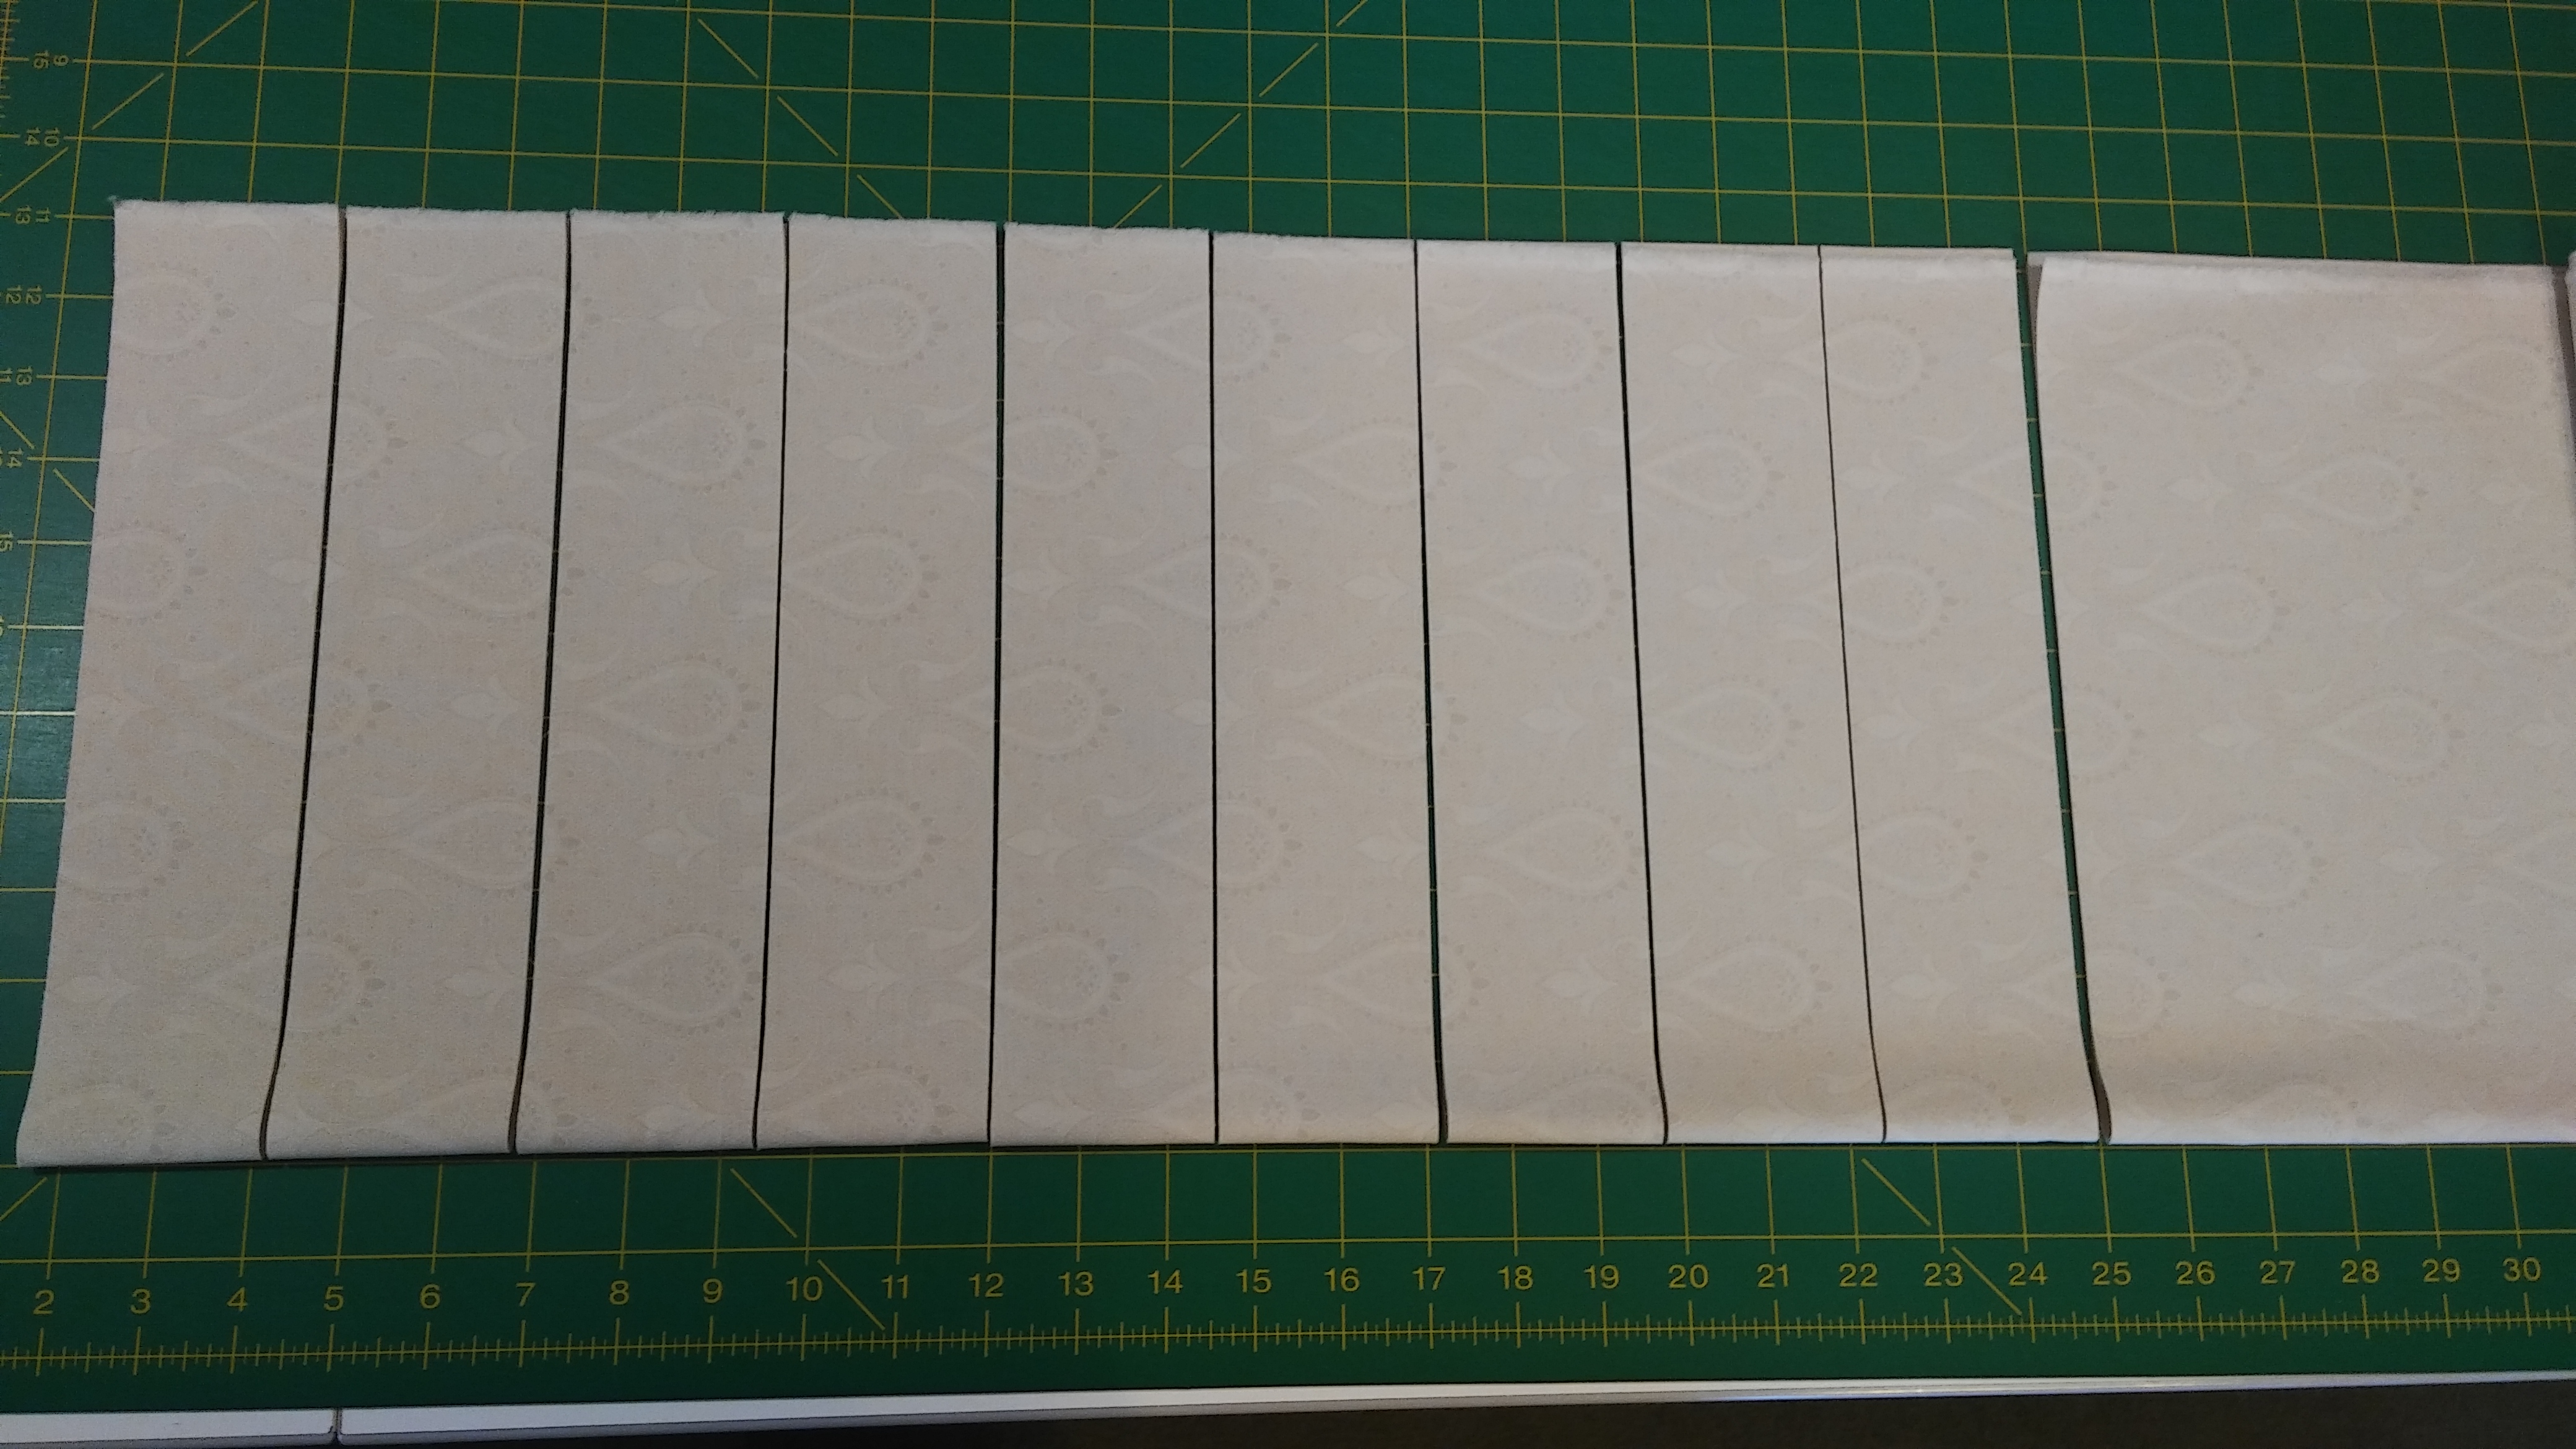 Cutting the neutral fabric for 4-patch units.
Piecing the 4-Patch Units (120—4 1/2” X 4 1/2”):
1. For this step you need the 2 1/2” X 22” strips cut from the Fat 8th’s and the 2 1/2” X 40” strips cut from the neutral fabric. You can cut the 40” strips in half or just sew 2-22” strips to a 40” strip with some fabric over hang.
2. Place a neutral strip 2 1/2” X 40” and a 2 1/2” X 22” strip right sides together, sew with a 1/4” seam.
*Chain piecing, or placing the next pair to stitch under the presser foot as the previous pair is completed, can save some time. You can piece all of the strips in this fashion, when done, cut the threads between the strips.
3. Take the strips to the ironing board. Gently press all seams toward the dark fabric. Press from the right side of the fabric.
*When pressing seams it is important to press from the front or right side of the fabric. I like to lay the strip with the dark fabric on top. Gently open the fabric using my fingers and fold the dark fabric back onto its seam. Then using the iron follow my fingers to give the seam a crisp finish. Pressing is the key! Keep your fabric and seam line straight as you press. Moving the iron in all directions will distort and stretch the fabric.
 Open and press seams to the dark fabric.
Now, the method to complete the 4-Patch is up to you. I’ll give you two possibilities.
5. The first method is to the lay the pieced strip onto the cutting mat. Use the lines on the mat to keep the seam line straight. With your rotary cutter, sliver trim an edge to establish a straight line to cut your pieces from. Now cut your strip into 2 1/2” X 4 1/2” units. It is important to keep your units square as you cut. Double check for a straight edge and that your seam line is straight. Sliver trim as needed to reestablish your straight edge.
You need to cut 240—2 1/2” X 4 1/2” units. Now is the time to go to your scraps or extra fat quarters if you are short a few blocks (each unit of the block is 2 1/2” X 2 1/2”). With right sides together place 2 units together, light to dark, nesting the seams, and sew with a 1/4” seam. Open the unit and press the seam to one side.
Method of layering to cut the units for the 4-patches.
OR 5. The second method for making a 4-patch unit, this is my favorite! Take 2 of the strip sets, place them right sides together, nest the seams and give them a press. Move the strip to the cutting mat and line up the seam with a line on the mat, sliver trim the left edge. Proceed to cut 120-2 1/2” X 4 1/2” units across the strip set. Keep your units square, sliver trim as needed to keep a straight edge for cutting. Leave your cut units together. Take the paired units to the sewing machine and stitch with a 1/4” seam. Double check your seams are still nested together as you sew the units together. Open the unit and press the seam to one side.
 120 4-patch units stitched and pressed.
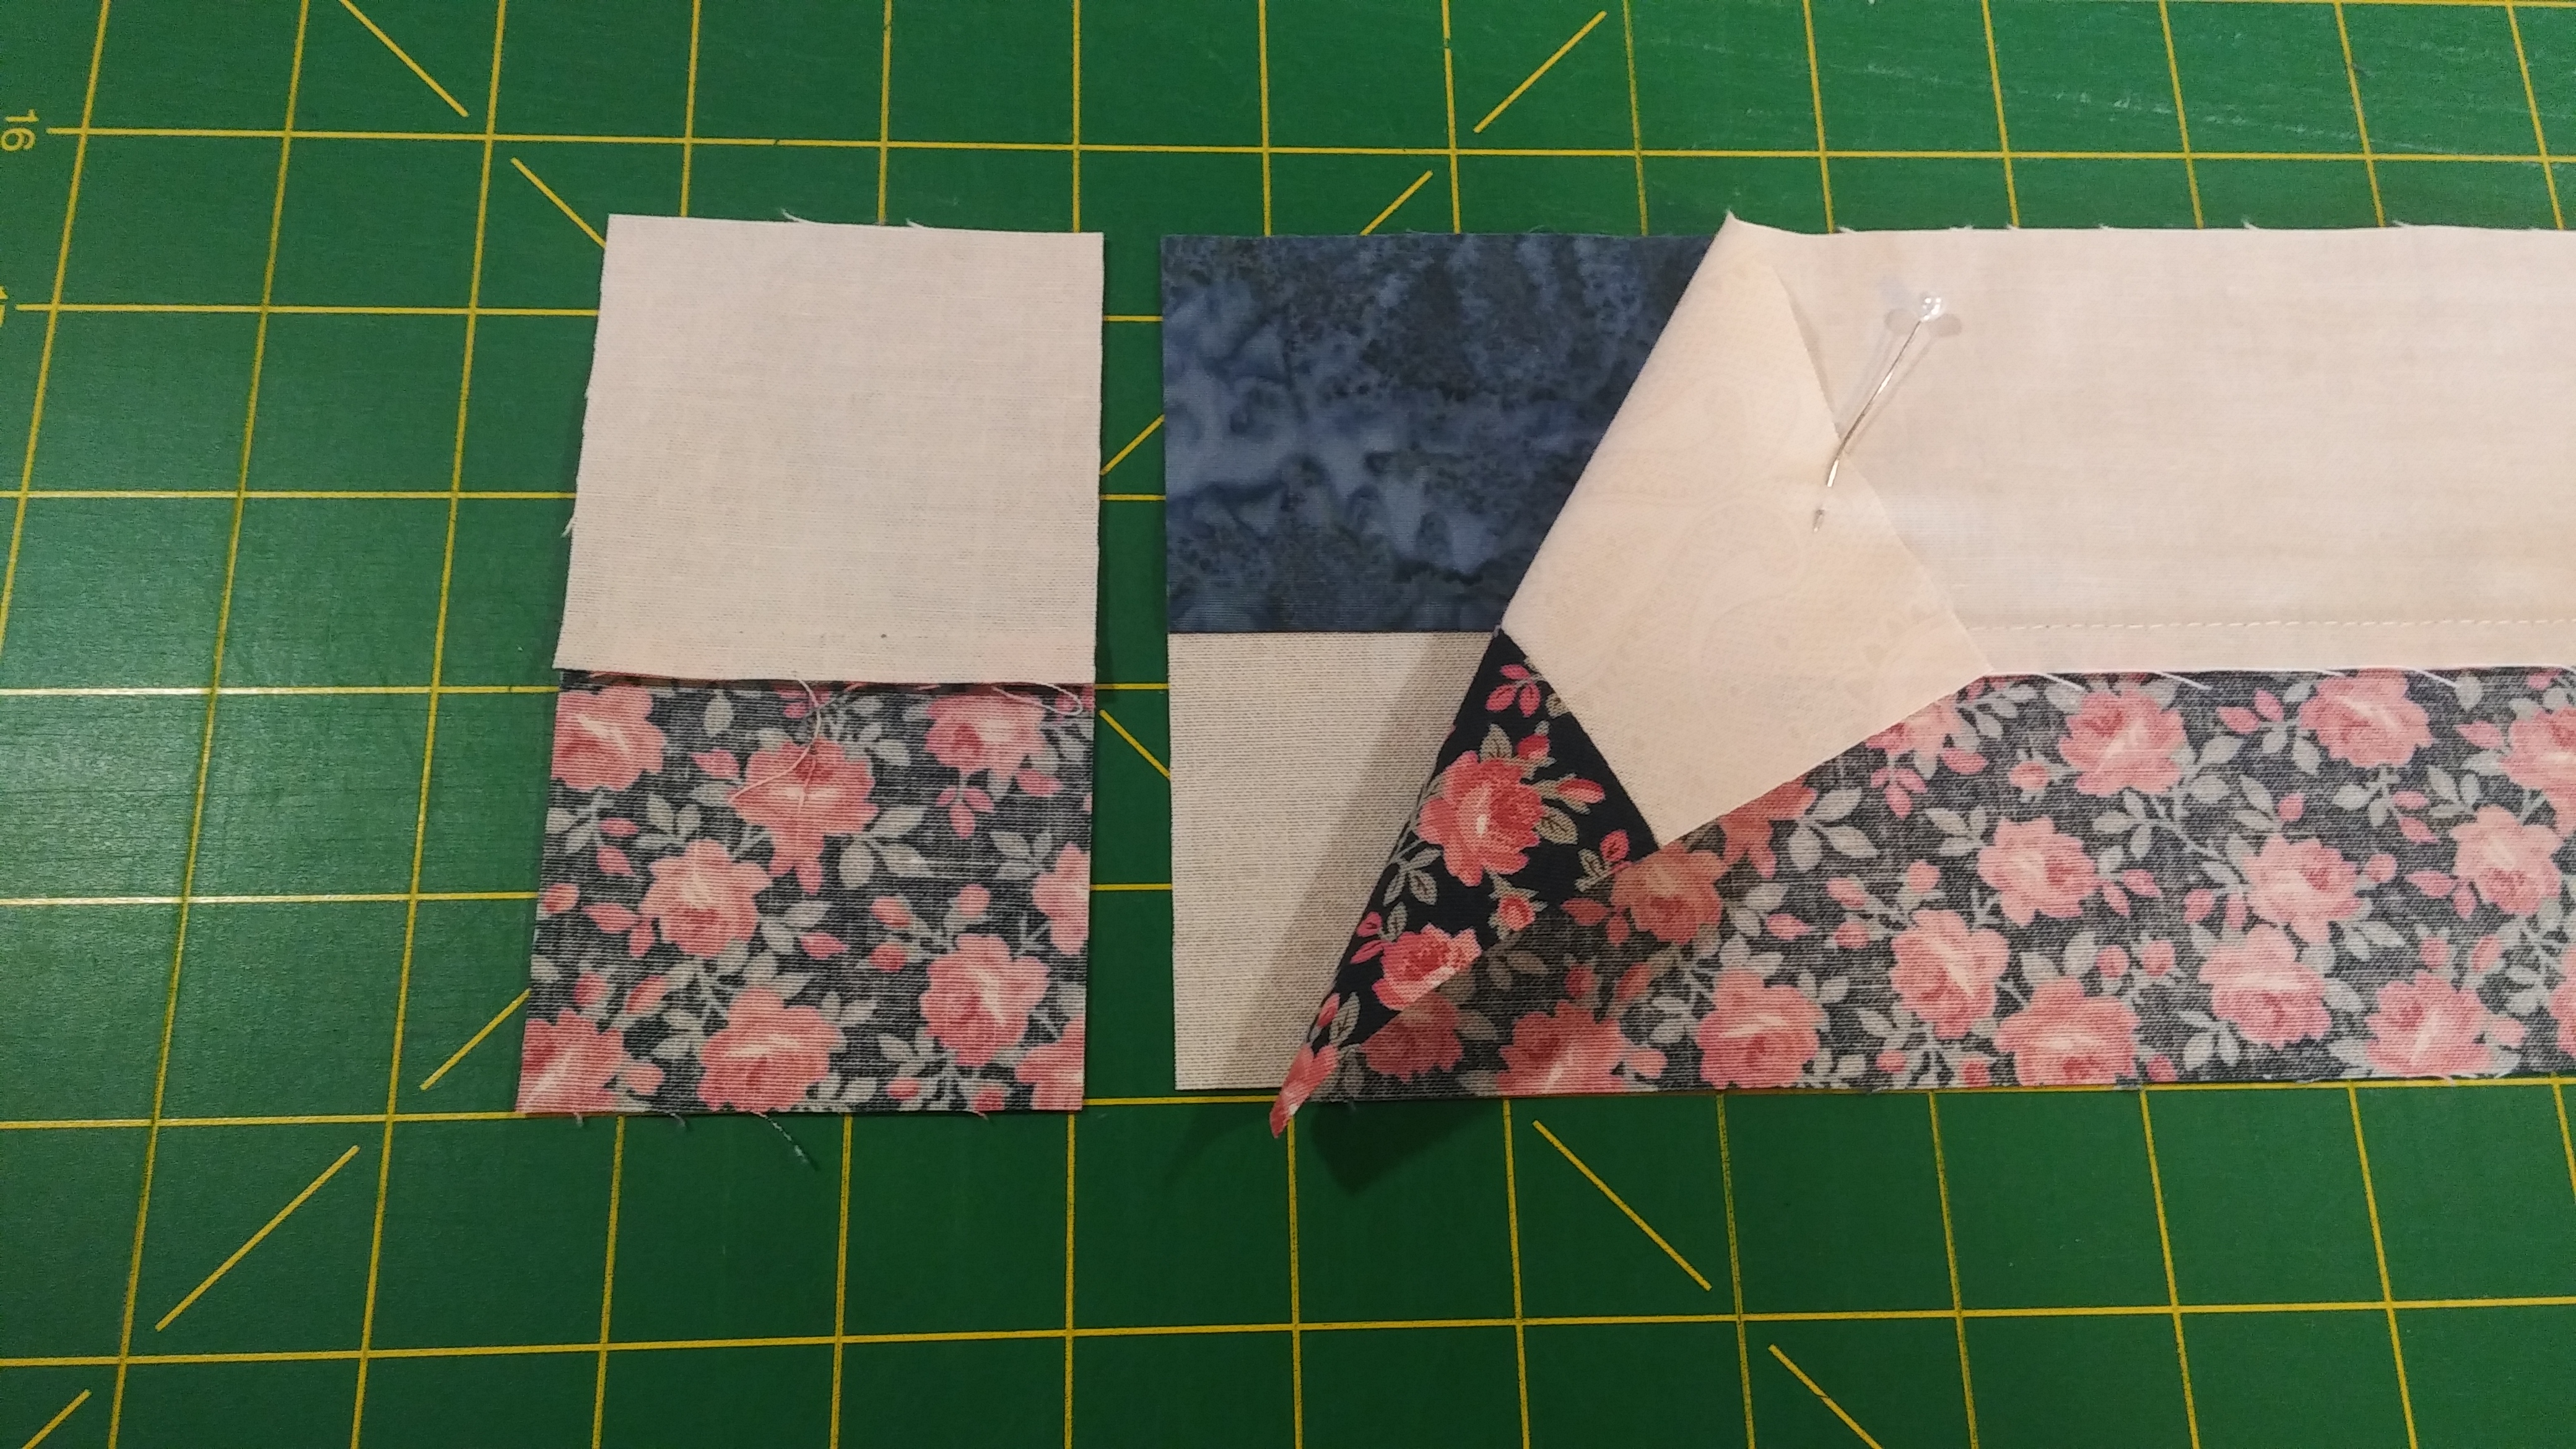
Building the Blocks (120):
Set the rectangle units on the left and the 4-patch units to the right. Keep the neutral/dark of all 4-patch units in the same direction if desired.

Flip a 4-patch unit onto a rectangle unit and sew with a 1/4” seam. Join all to yield 120 units. Press seams toward the rectangle. Your block will measure 4 1/2” X 14 1/2”.
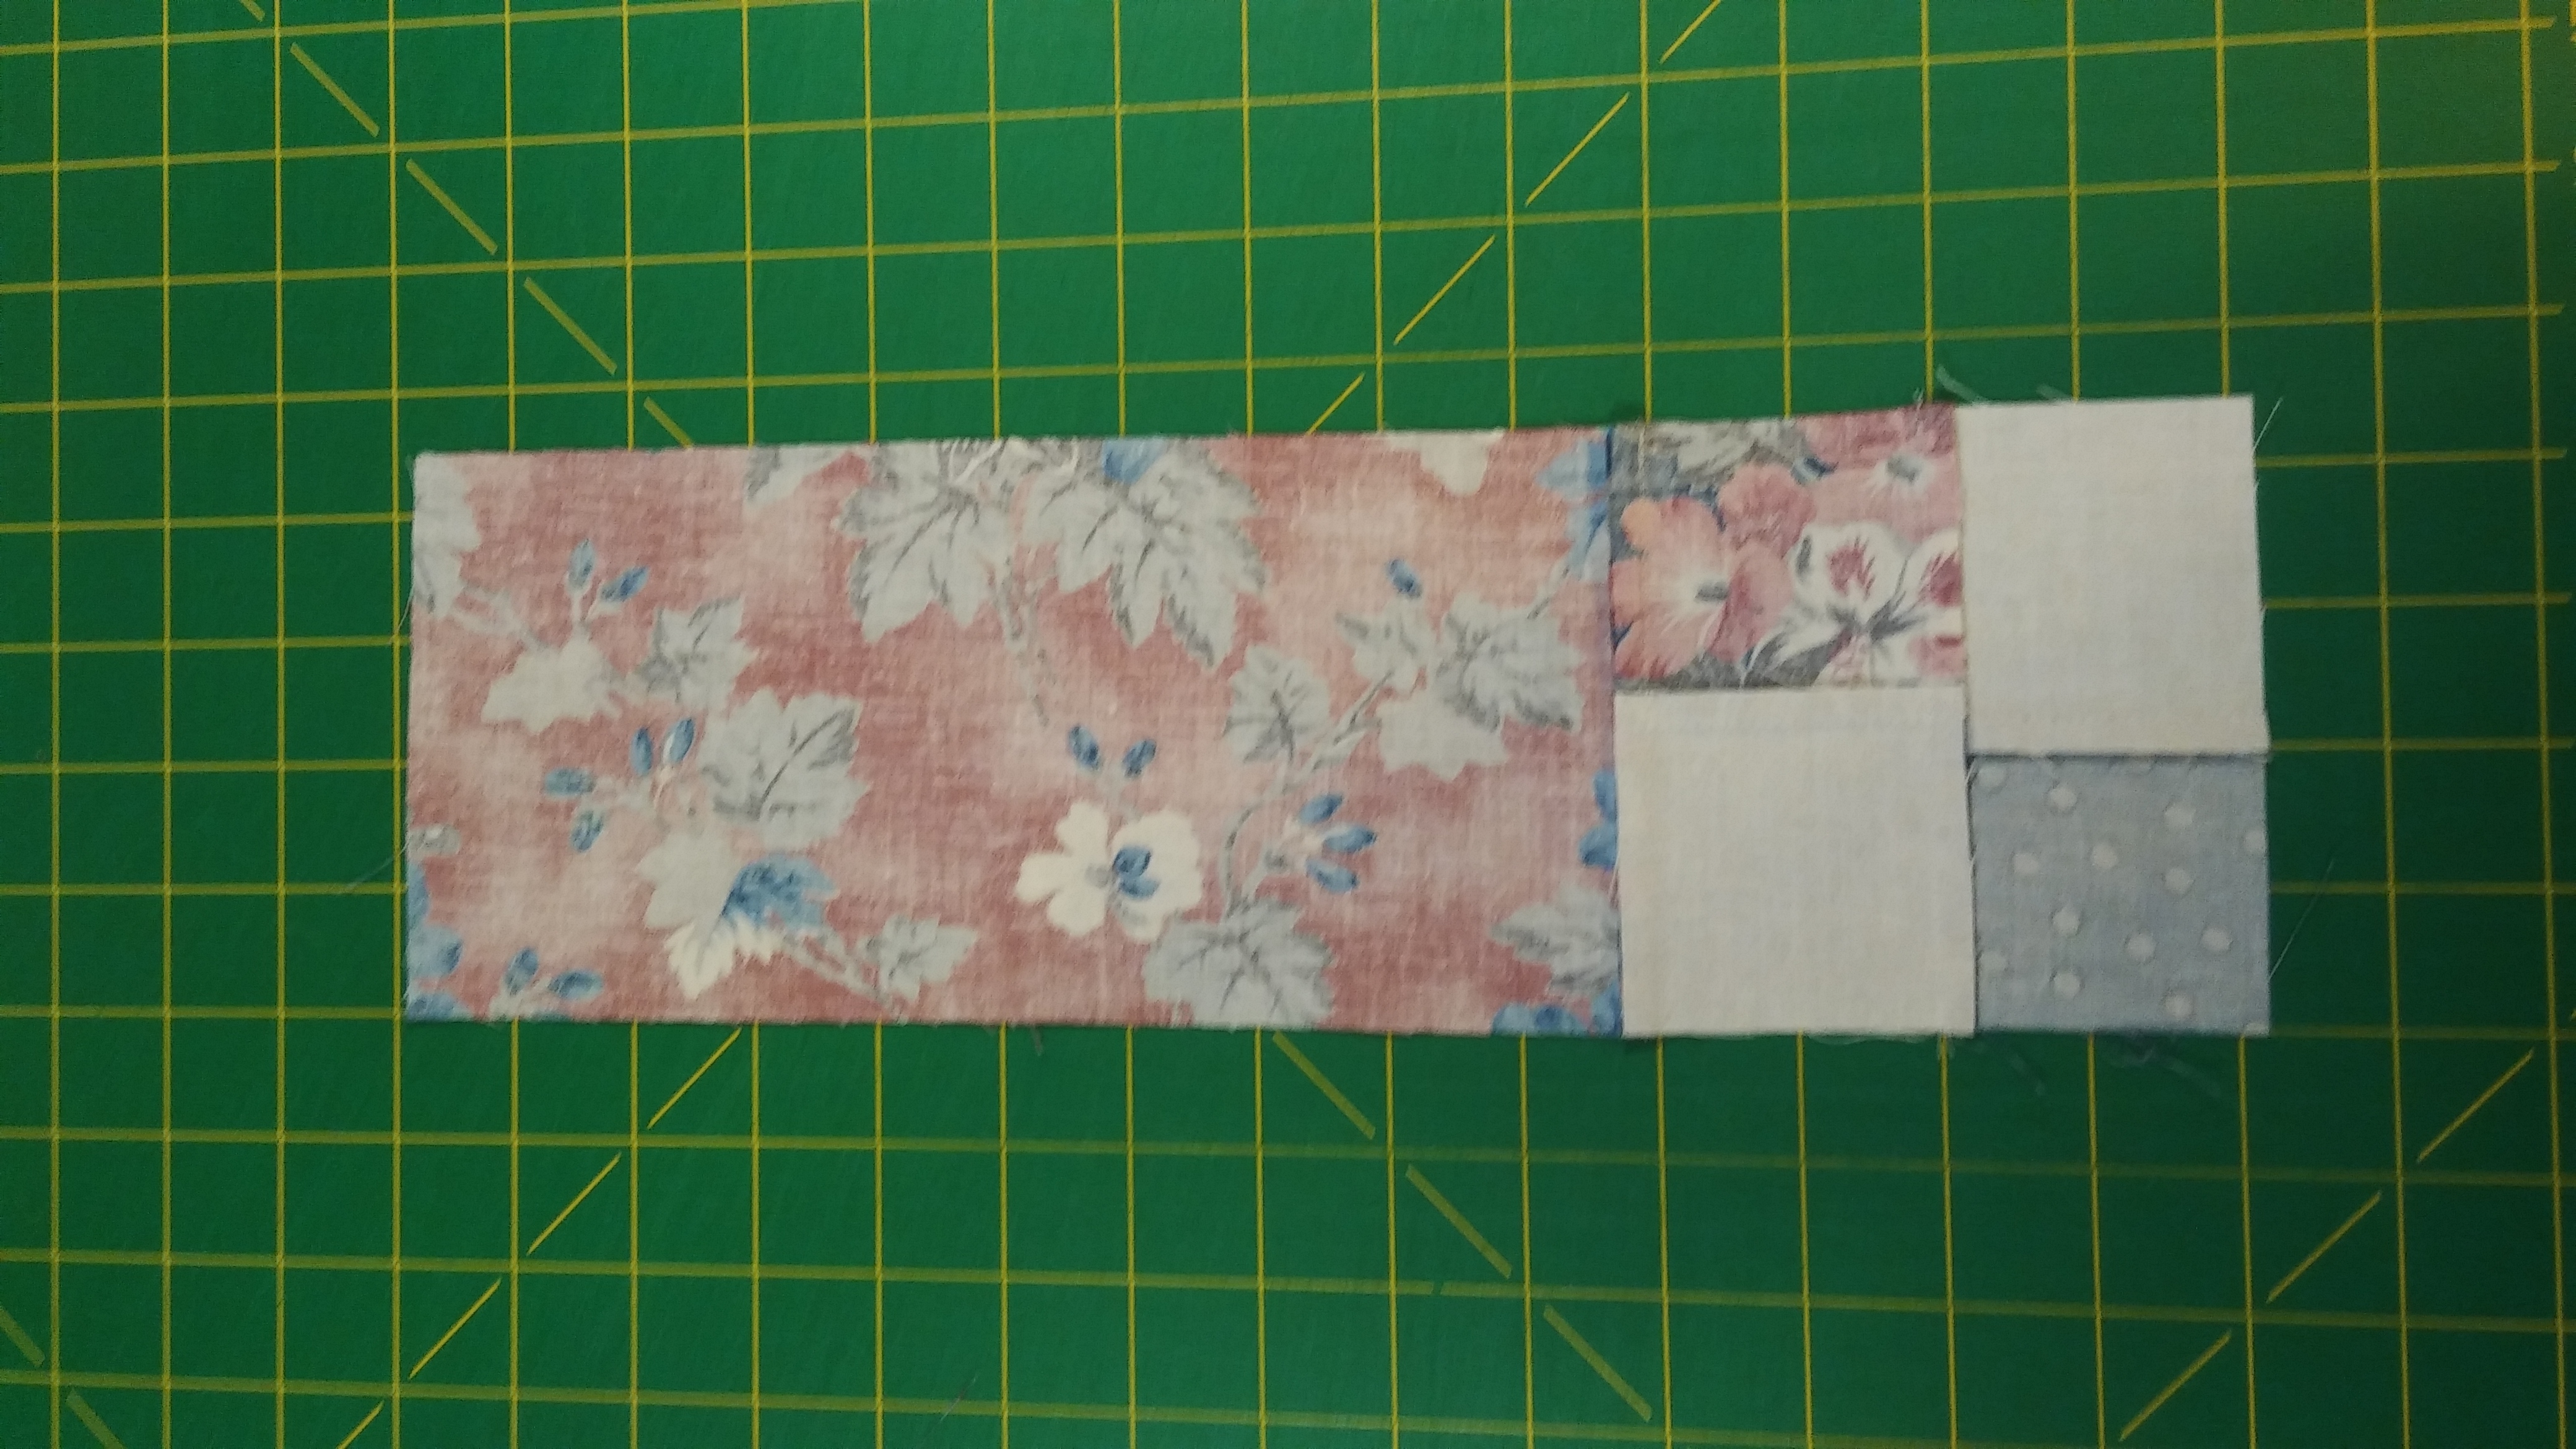 Completed block, seam pressed to rectangle.

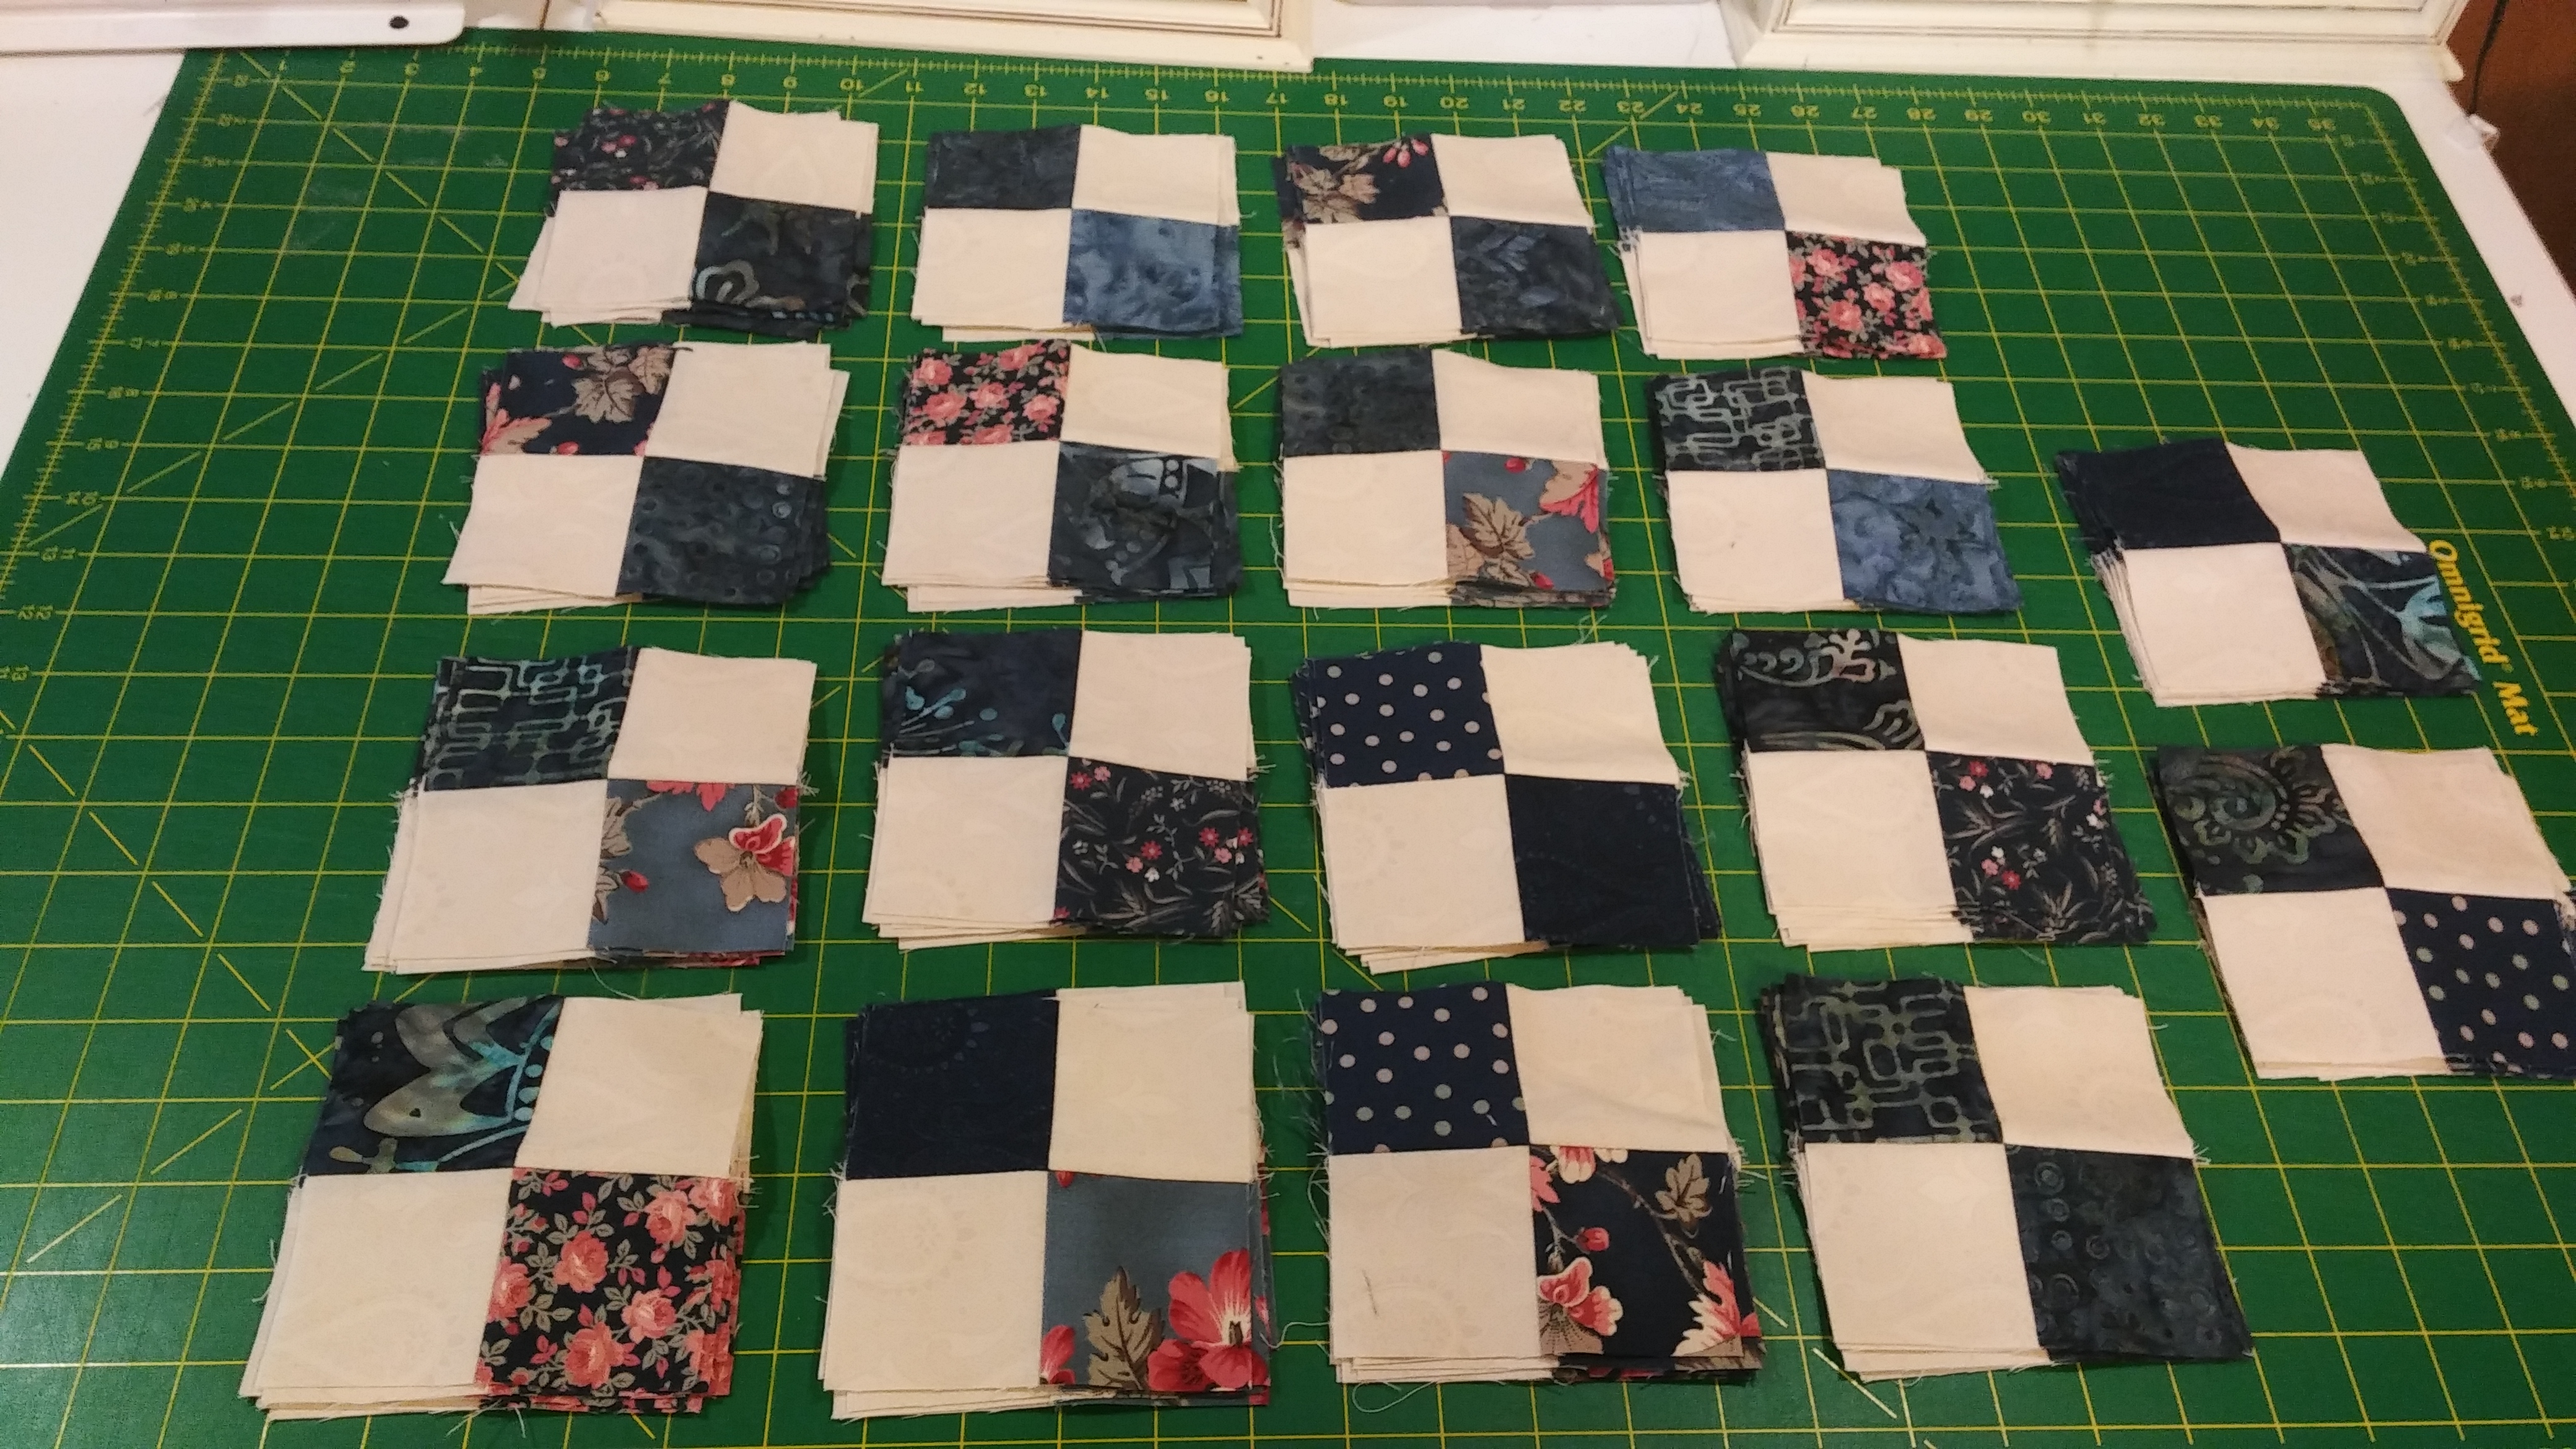
 120 Blocks ready to be set into the quilt top.
Complete the Quilt Top:
The layout your blocks in this quilt is 20 blocks across by 6 blocks down.
Alternate the rows to begin with a 4-patch, next row begin with a rectangle and so on… Adjust the blocks into a pleasing arrangement. Sew the vertical rows of 6 blocks together, press the seams toward the rectangle.
 Close up of alternating the blocks in the layout.
I like to piece the 1st 10 vertical row together and press the seams with even number (2, 4, 6, 8, 10, etc.) of rows in one direction, and odd number (1, 3, 5, 7, etc.) of rows in the opposite direction. Then join the 2nd set of 10 vertical rows together in the same manner of pressing. Finally join the 2-panels of 10 rows together and pin. Sew the final seam and give the top a final pressing.
Since this is a quilt top that does not have borders, there are seams at the outside edge of the quilt. These can easily open with the slightest tug. To stabilize the quilt top I baste all of edges of the quilt top with a 1/4” seam.
Quilting:
Depending on how you want to complete the quilting, there may be different requirements. So if you are hiring a professional quilter (hand or longarm) check with them for what they need to complete the quilting. As a professional longarm quilter I ask my customers for all quilts to have a backing fabric and batting that is 6” larger in width and length than the quilt top. So for this quilt I’d need a backing and batting that is 90” X 90”. A whole cloth or wide backing is best. If the backing is to be pieced, the seam should run horizontally (left to right) to load onto a quilt frame. This reduces the chances of puckering on the back. The batting should also be of good quality. The quilting design used on the quilt in the photo is Linnea by Christy Dillon of My Creative Stitches.
Binding:
You need 335” of binding to complete this quilt.
To make the binding, press the fabric as done in previous steps. Lay the fabric on the cutting mat. Line up the fold with a line on the mat, and the 20” edge near a line on the mat. Sliver trim the 20” edge to get a straight line to begin cutting. Cut 9—2 1/4” X 40” strips. Join all 9 strips on the 45 degree angle. Trim the excess leaving a 1/4” seam, press seam open. Press the binding wrong sides together.
Attach the binding with a 1/4” seam. Turn the binding to the opposite side and finish by hand or machine.
*I complete most of my bindings by machine. I first attach the binding on the back of the quilt. Then turn the binding to the front of the quilt and pin. I finish by machine with a straight stitch about 1/8” from the edge of the binding on the front. I match my finishing top thread with the binding fabric, and the bobbin thread with the quilt backing.
If you have any questions, feedback, or would like to share a picture of your quilt with me, you may find me at www.facebook.com/longarmquiltingbypam or my website at www.pamslongarmquilting.com.
Other thoughts for this pattern:
This pattern was written for use of a full, 42 fabric, Fat Eighth bundle. Many fabric bundle do not have 42 fabrics. Make a quilt with the fabric in the bundle. It may be smaller but the process is the same. Remember each Fat Quarter can easily be cut into 2– Fat 8th’s. Grab a friend and share a bundle of Fat Quarters. This is an especially easy and fast baby quilt. Make a few blocks and build a couple of fabric panels. Use your favorite bag pattern for a new tote.
![]()
This quilt finishes at 82" x 82".
Using the Fat Eighth Bundles allows the pleasure of working with all the fabric in one collection. I love the challenge of taking many fabrics and incorporating them into one quilt. Scrap quilts are my favorite! Come and check out other patterns in print by Pam Mildren Designs on my website www.pamslongarmquilting.com or at your local quilt shop.
Pam Mildren Designs
www.pamslongarmquilting.com
www.facebook.com/longarmquiltingbypam
![]()
Posted in:
Comments