Welcome to Moda Fabrics!
Follow The Stars Home Quilt
Follow The Stars Home Quilt
Published:
Aug 2 2017 - 23:00


Hello fellow quilters! Today I have for you Follow the Stars Home, a KING SIZE quilt pattern. One of my second favorite quilt block are stars. This is a perfect quilt to lay across your bed just in time for the holidays or to enjoy year around. Of course it also makes a great gift for someone special too! I hope you enjoy this amazing Fat Quarter quilt I've designed. This quilt pattern has two star blocks. One fat quarter will yield you both blocks. (Plus background of course.) If you are familiar with the "no waste" flying geese method, a half square triangle method and basic block building then you will enjoy this quilt pattern! If not, I hope you will still give it a try while learning a new technique. The quilting I personally did; I choose to quilt Anchors in a cream/linen color to blend in with the background to give it more of a beveled look. I hope you enjoyed my Follow the Stars Home quilt pattern and tag me on Instagram of your progress photos or finished quilts. Or use #letsquiltsomething
This quilt finishes at 112" x 112".
A nice large king size that will cover pillow top mattress or thicker mattress. It will cover all sides so you won't see your sheets underneath.
![]()

25 - Fat Quarters - Fat Quarter Bundle by Janet Clare Ahoy, Me Hearties
9 1/2 yards background fabric Grunge Basics Manilla 30150 102 Moda Basic
10 1/2 yards backing fabric Janet Clare Ahoy, Me Hearties 1431 14
1 yard binding fabric Janet Clare Ahoy, Me Hearties 1433 15
![]()
Cutting:
1.With each fat quarter sub-cut;
- 1 – 5 ¼” square
- 4 – 5” squares
- 6 – 3” squares
- 4 – 2 ½” x 4 ½” rectangles
- 4 – 2 ½” squares
2.With background fabric sub-cut;
- 288 - 2 1/2" squares (18 strips 2 1/2" x WOF)
- 198 - 3 " squares (15 strips 3" x WOF)
- 149 - 4 1/2" squares (17 strips 4 1/2" x WOF)
- 24 - 5 1/4" squares (3 strips 5 1/4" x WOF)
- 25 - 9 1/4" squares (5 strips 9 1/4" x WOF)
- 96- 4 1/2" x 8 1/2" rectangles (11 strips that are 8 1/2" x WOF)
Piecing Block "A" (Large Star Block): Keep like prints within each block
1.With the background 9 1/4" square and 4 same print 5” squares. First with your 5” squares on the wrong side, draw a line diagonally on each square. Next place 2 - 5” squares right sides together on the corners shown below. (Note they will overlap.) Pin them to hold them in place and sew ¼” on both sides of the diagonal line. Cut on the line you drew and press open. With the remainder of your 2 - 5“ squares place them on the opposite diagonal, sew ¼” on both sides of the diagonal line. Cut on the line you drew again and press open. You’ll now have 4 flying geese units that are 4 ½” x 8 ½”.

2.With a print 5 ¼” square and 4 background 3” squares. First with your 3” squares on the wrong side, draw a line diagonally on each square. Next place 2 - 3” squares right sides together on the corners shown below. (Note they will overlap.) Pin them to hold them in place and sew ¼” on both sides of the diagonal line. Cut on the line you drew and press open. With the remainder of your 2 - 3“ squares place them on the opposite diagonal, sew ¼” on both sides of the diagonal line. Cut on the line you drew again and press open. You’ll now have 4 flying geese units that are 2 ½” x 4 ½”.

3.Take your small 2 ½” x 4 ½” flying geese units from step two, 4 matching print 2 ½” squares, and your background 4 ½” block. Form the block below. Sew your units into rows and lastly sew your rows together to complete the middle star block.

4. With 4 background 4 1/2" squares, your larger flying geese units made in step one and the blocks made in step three, form the block below. Sew your units into rows and lastly sew your rows together to complete your large star block.

5. Make a total of 25 large star blocks (Block A) per fat quarter print.
Piecing Block "B" (Small Star Block): Keep like prints within the block.
1.With a background 5 ¼” square and 4 print 3” squares. First with your 3” squares on the wrong side, draw a line diagonally on each square. Next place 2 - 3” squares right sides together on the corners shown below. (Note they will overlap.) Pin them to hold them in place and sew ¼” on both sides of the diagonal line. Cut on the line you drew and press open. With the remainder of your 2 - 3“ squares place them on the opposite diagonal, sew ¼” on both sides of the diagonal line. Cut on the line you drew again and press open. You’ll now have 4 flying geese units that are 2 ½” x 4 ½”.
2.Next with 2 print 3” squares and 2 background 3” squares, draw a diagonal line on the back of your print 3” squares. Place a print and background square right sides together and sew ¼ on both sides of the line you drew. Cut on the line and press open. One pair/set will yeild 2 - 2 ½” HST. Make a total of 4 - 2 ½" HST.
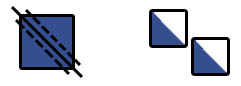
3.With 4 print 2 ½” x 4 ½” rectangles and 4 background 2 ½” squares, place the background square on the right side, sew at a diagonal, trim ¼” away and press open.
![]()
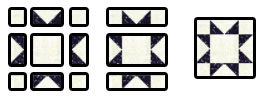
4.With the HST made in step 2 and your rectangle units made in step 3, and 4 background 2 ½” square, form the block below.


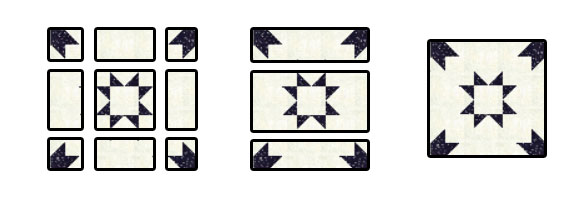
5.Take your small 2 ½” x 4 ½” flying geese units from step one, 4 background 2 ½” squares, and your background 4 ½” block. Form the block below. Sew your units into rows and lastly sew your rows together to complete the middle star block.
6.With the star block made in step 5, 4 – background 4 ½” x 8 ½” rectangles, and the blocks made in step 4, form the block below. Sew your units into rows and lastly sew your rows together to complete your small star block.
7. Make a total of 24 small block stars (Block B).
Forming your Quilt Top:
1.Use a design wall to lay your blocks out accordingly. You'll be alternating blocks A and B. Finished top has 7 rows, 7 blocks in each row.
2.First sew your blocks together to form rows.
3. Next sew your rows together.


4. For your backing fabric; cut backing into three 123" x WOF and piece horizontally.
5. Quilt and then Bind. =)
![]()
This quilt finishes at 112" x 112".
I hope you enjoyed Follow The Stars Home quilt pattern! Here are a couple close up photos for you to see the quilting work I did personally. I can’t wait to see what fabrics you’ll use for this quilt pattern. Tag me on Instagram for your progress photos or finished quilts. Or use #letsquiltsomething Happy Quilting!


Krystal Jakelwicz
{www.letsquiltsomething.com}
{www.letsquiltsomething.blogspot.com}
{www.instagram.com/letsquiltsomething}
{www.facebook.com/letsquiltsomething}
![]()
Posted in:
Comments