Welcome to Moda Fabrics!
At the Seashore - Melt
At the Seashore - Melt
Published:
Jul 23 2019 - 23:00
Hi, all you Summer beach-goers. There is nothing more splendid than a day at the beach. I was lucky to be a beach babe, growing up in the Port Hacking, south of Sydney, Australia. Summer by the ocean was especially, a magical time as our days were filled with water skiing, sailing and fishing from sun up to sun down. I can never forget the feel of the sun on my skin, the sultry heat of a Sydney summer and the smell of salt from the ocean.
This post is part of our summer quilt-along series. Find the rest of the posts by clicking {here}.

One of my favourite memories of summer was visiting Strawberry Fair at Cronulla. It was an ice-creamery that had 100 flavours! My favourites were musk stick, lime and pineapple and bubblegum. My block today is all about ice-cream and ice blocks. (A little cultural exercise in translation - we Aussies call a popsicle an ice-block if it is made without milk and an ice-cream if made with milk. To confuse you even more, we call ice-cream in a cone, ice-cream as well).
![]()
Fabrics are from Rubystar Society.
- Background: 1 Fat Quarter 18” x 22” of light fabric
- Ice-cream cones: 2 squares - 5” x 5” of yellow/light orange prints
- Ice-cream: 2 rectangles - 2 ¾” x 3 ½” of green and pink prints (L)
- Ice-block: 1 rectangle - 2½” x 4 ¾” orange print (O)
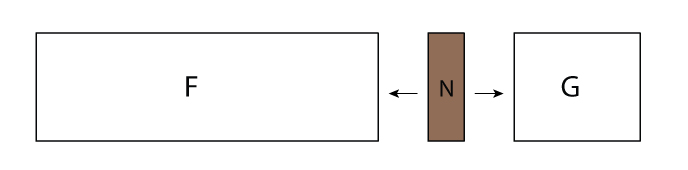
- Ice-block stick: 1 rectangle - 1” x 2” brown print (N)
![]()
- Template plastic or cardboard.
- {optional} embellish the ice-cream cones with themed buttons such as cherries or strawberries. Add ocean themed novelty buttons to the blocks, such as seaguls, crabs, starfish, and turtles.
![]()
Preparation
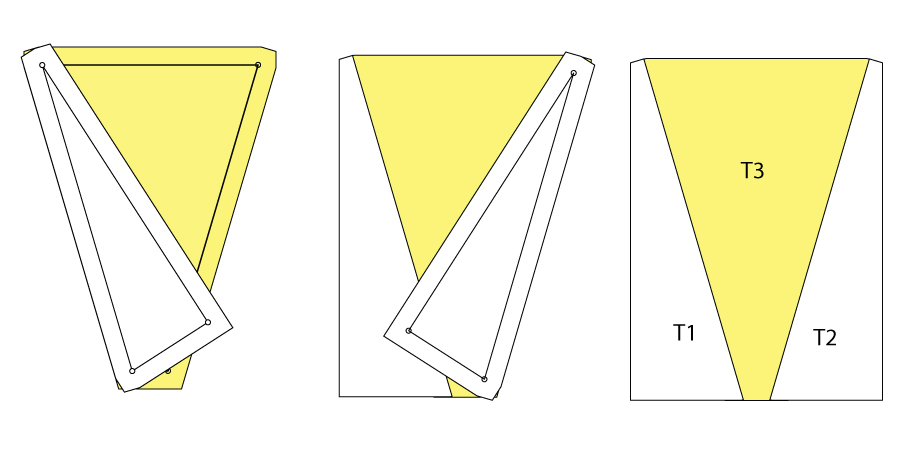
Make templates T1, T2 and T3 - Download templates here.
* For the foundation paper piecing enthusiasts you can download the templates here*
Cutting

From the background fabric cut:
- 2 strips - 1 ½” x 12 ½” (A)
- 2 strips - 1 ½” x 10 ½” (B)
- 1 rectangle - 2 ½” x 3 ½” (C)
- 1 rectangle - 4 ½” x 4 ¾” (D)
- 2 strips - 1 ½” x 4 ¾” (E)
- 1 rectangle - 2” x 5 ¼” (F)
- 1 rectangle - 2” x 2 ¼” (G)
- 4 squares - 1 ¼” x 1 ¼” (H)
- 2 squares - 1” x 1” (I)
- 2 squares ¾” x ¾” (J)
- 1 rectangle - 3” x 3 ½” (K)
- 1 rectangle - 1 ½” x 3 ½” (P)
- Using template T1 cut 2 triangles
- Using template T2 cut 2 triangles
From the Ice-cream cones fabric, using T3 cut:
- 2 ice-cream cones
BLOCK ASSEMBLY
Ice-cream Cones
- Sew T1 to left side of T3. Press towards T1.
- Sew T2 to the right side of T3. Press towards T2.
- Make 2 ice-cream cones.
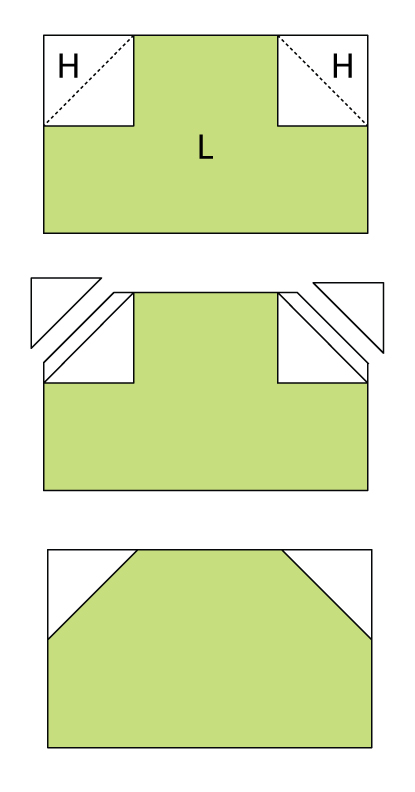
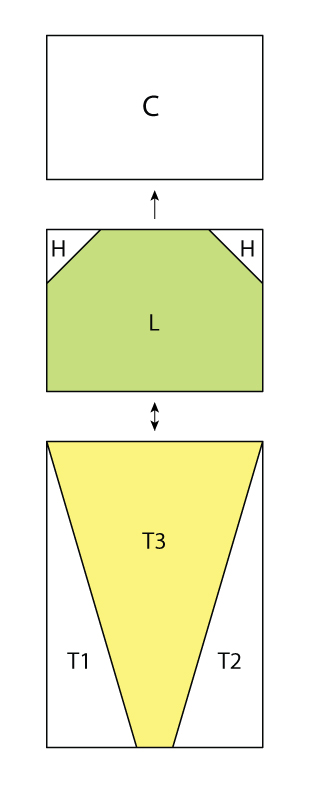
Ice-Cream
- Place a 1 ¼” x 1¼” square (H) on top, left-hand corner of 2 ¾” x 3 ½” rectangle (L).
- Sew on the drawn line.
- Trim a ¼” away from stitched line.
- Press triangle back.
- Repeat on the other side.
- Make 2 ice-creams
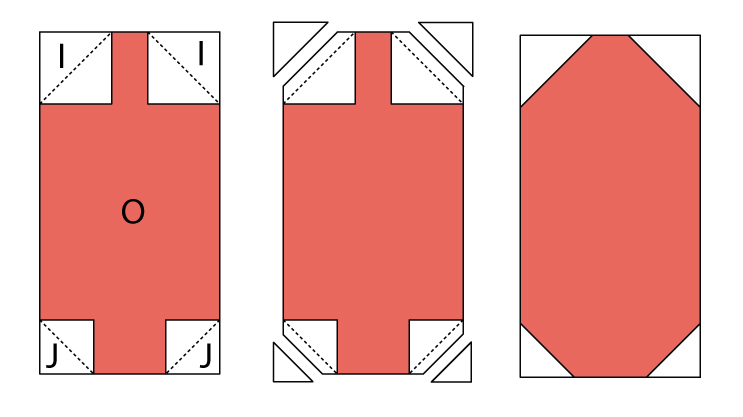
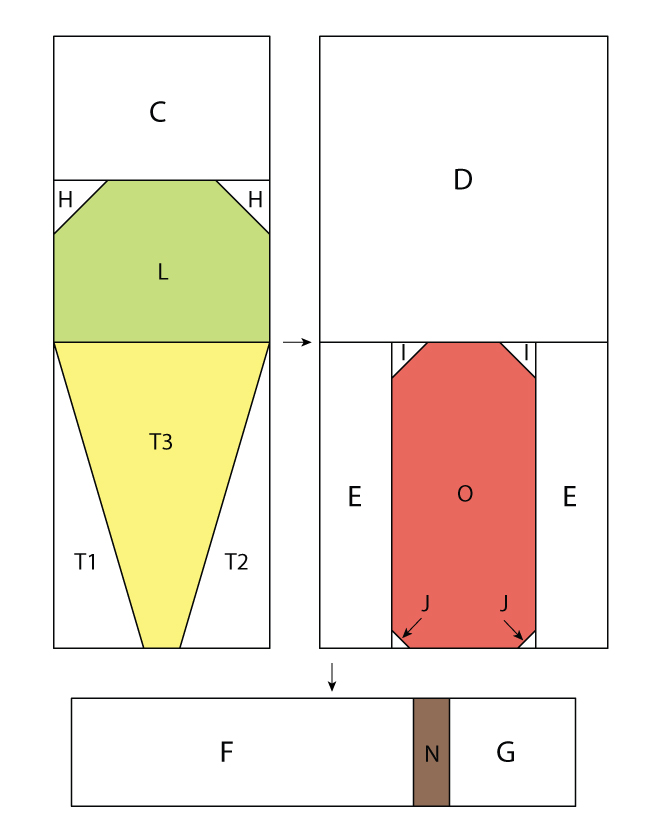
Ice-block
- Place a 1” x 1” square (I) on top corners of a 2½” x 4 ¾” (O) rectangle.
- Sew on the drawn line.
- Trim a ¼” away from the stitch line.
- Press triangles back.
- Place a ¾” x ¾” square (J) on bottom corners of (O) rectangle.
- Trim a ¼” away from the stitch line.
- Press triangles back.
Units
- Make units 1 to 6. Press in the direction of the arrows.
Unit 1
Unit 2

Unit 3

Unit 4
Unit 5
Unit 6

Block Borders
- Sew piece B - 1 ½” x 10 ½” to sides of the block.
- Sew piece A - 1 ½” x 12 ½” to top and bottom of the block.

![]()
This block finishes at 12" x 12". (12 1/2" x 12 1/2" unfinished).
Looking for more summer-themed blocks, visit my website to download 3 extra blocks and see a glimpse of my completed quilt.
Jane Davidson
Find me at
Website
Instagram @quiltjane
e-store Patterns and notions.
Facebook - Want it Need it Quilt
![]()
Comments