Welcome to Moda Fabrics!
BH5 – Group 2, Block 14 – Brigitte Heitland
BH5 – Group 2, Block 14 – Brigitte Heitland
Published:
Apr 3 2024 - 07:00
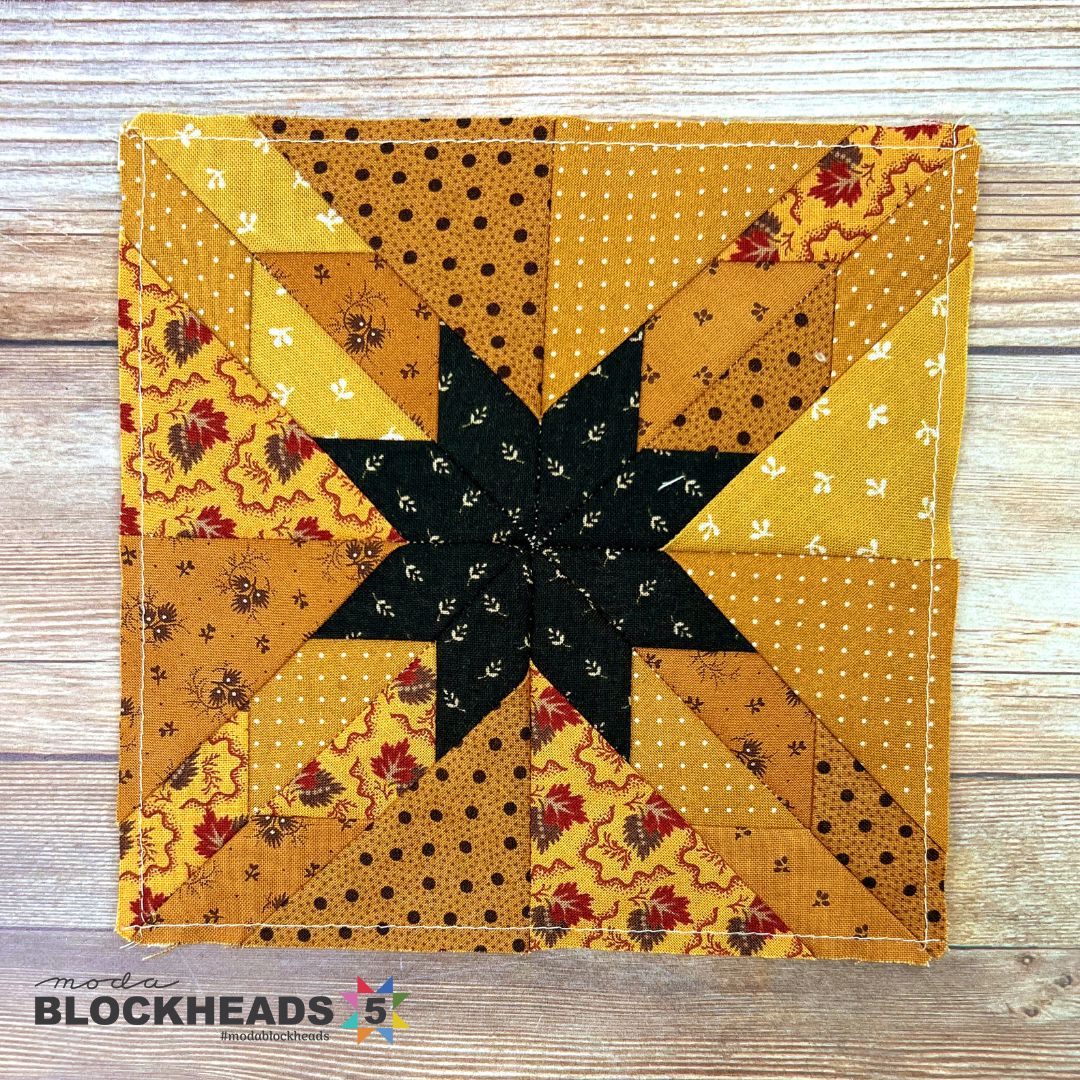
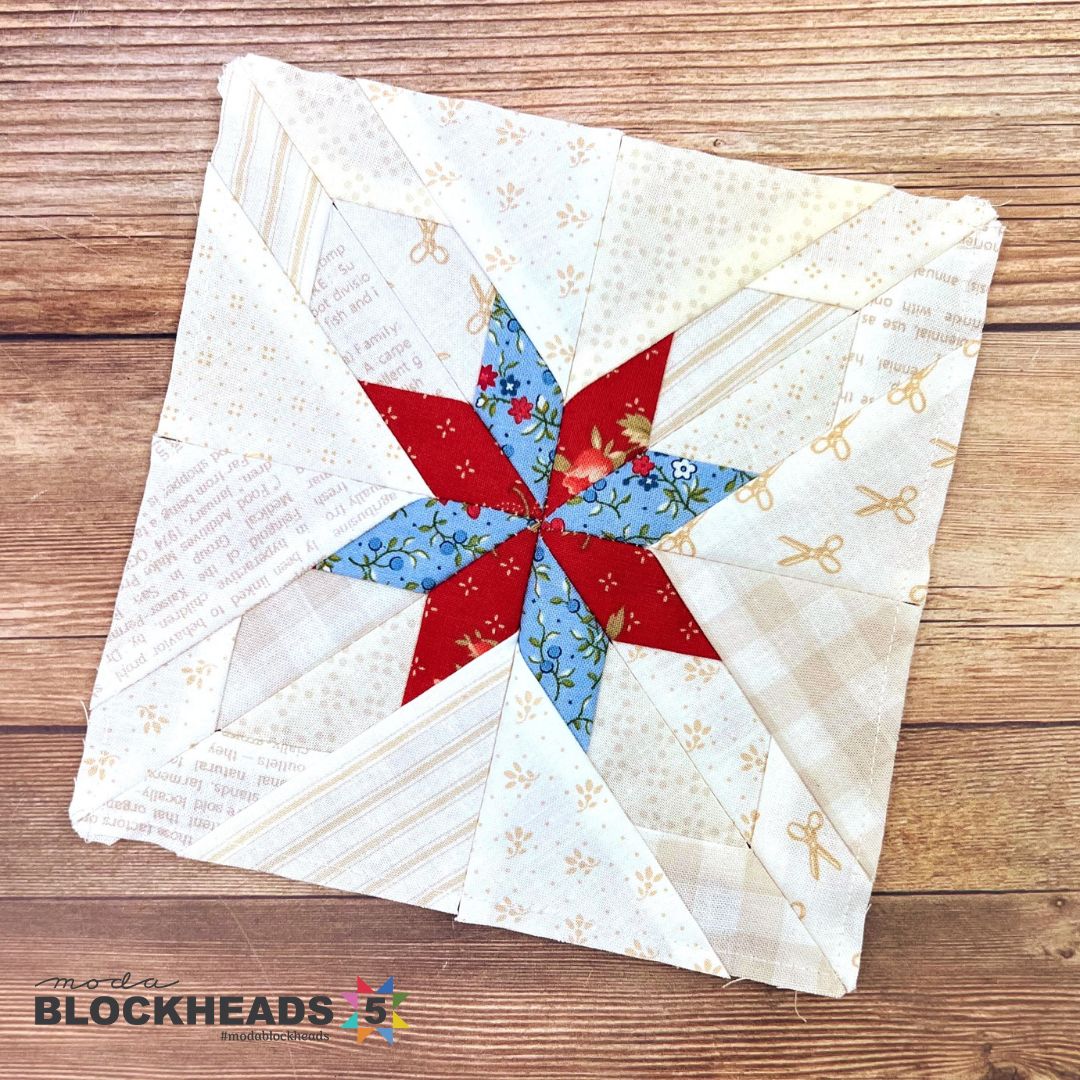
Happy Blockheads Wednesday! Brigitte Heitland of Zen Chic is our featured designer for Week 14, and she’s designed a block that is unmistakably zen and chic! Brigitte’s Radiant Starfire block is beginner-friendly foundation paper piecing pattern that stitches up quickly and has so many options for making the design your own!
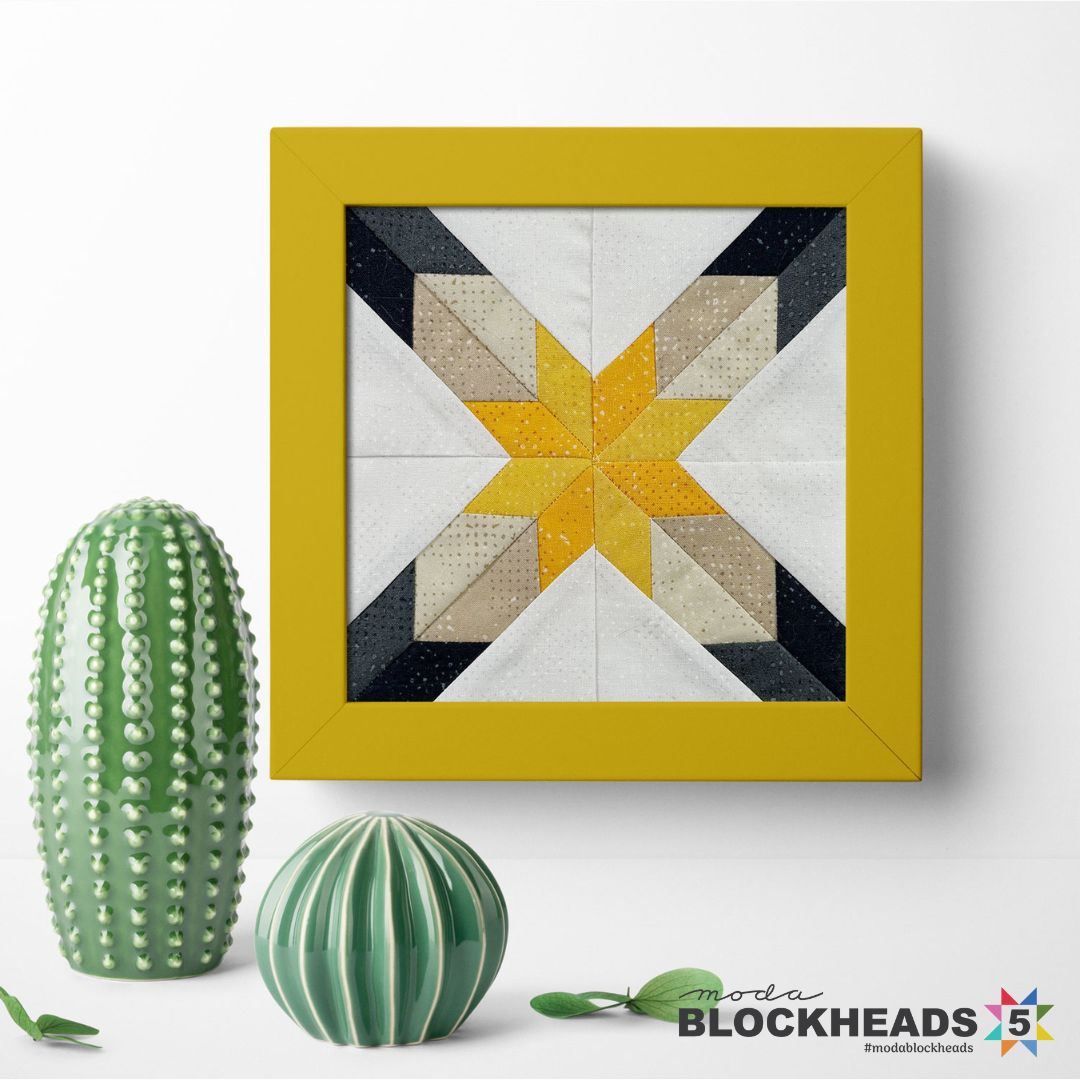
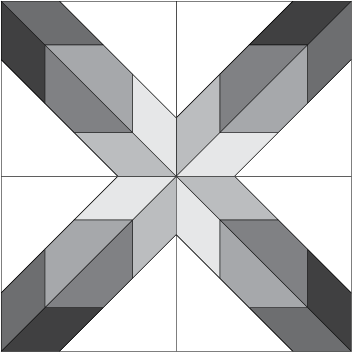
You can find this week’s pattern here: BH5 – Group 2, Block 14 – Radiant Starfire by Brigitte Heitland
Follow along with Brigitte!
Instagram: @zenchicmoda
www.brigitteheitland.de
If you’re new to Blockheads, here are a couple of quick things to know:
- This is a free quilt-along. No sign-ups are required. Just download the pattern and you’re ready to sew!
- The PDF patterns will be posted on the Moda blog and in the official Facebook group every Wednesday by 8:00 AM CDT.
- You can also bookmark this page: Blockheads 5 main page to find a convenient list of all the patterns as they are released.
- If you’d like to sign up for our blog newsletter to get blog posts delivered to your inbox, you can sign up here: Blog Newsletter Sign-Up
- If you want to sew along with a virtual Blockheads community, head over to Facebook and join our official Moda Blockheads Facebook group. Our group is an active and vibrant community of 72,000 quilters and counting! It’s a great place to be inspired and share pictures of your Blockheads progress.
- If Instagram is where you prefer to hang out, be sure to follow us (@modafabrics) and the hashtags #modablockheads and #modablockheads5 to see the latest blocks from our designers and other Blockheads.
- Be sure to get your official Blockheads t-shirts, sweatshirts, tote bags, water bottles, and more from our pop-up shop HERE.
(Looking for a little more information about Blockheads? You can check out the Blockheads 5 archive HERE.)
Be sure to head over to Brigitte’s blog to read her post about Radiant Starfire today! She’ll be sharing her block pics and her tips and tricks, so you won’t want to miss it. Visit her blog here: Radiant Starfire on the Zen Chic blog
Something new we’re doing for this round of Blockheads is a weekly video. You can follow along with me as I sew the block of the week and share my tips and tricks and talk about different construction techniques. I’ll post the videos on YouTube and share them here on the blog. You can watch this week’s video below:
In this week’s video, I take you step by step through piecing one of the templates in the Radiant Starfire pattern. If you’re new to paper piecing and/or are a visual learner, hopefully this week’s video will be a big help!
Our fabric cutting this week is super easy! We’re just going to cut rectangles in 3 different sizes. Use the cutting instructions we’ve provided and you are going to have plenty of fabric to cover each section of the templates and into the seam allowance – I didn’t have to rip and re-stitch at all, and usually I have to do that at least once because I have cut a piece of fabric a little too small.
I didn’t take any video at my sewing machine for this week’s block, so if you’re looking for a little bit more of a visual guide on the actual stitching of the template, you can check out my video tutorial for Brigitte’s FPP block from Group 1 of Blockheads 5:
If you just need a quick refresher, here are some general FPP tips to keep in mind:
General FPP tips
- Print or copy the pattern PDF and templates at 100% or “Actual size” to ensure accuracy. The template pages will have a 1” square gauge on every page; be sure to measure that square after printing to confirm that it is exactly 1”. The seam allowances for each template must also measure exactly 1/4”. Confirm all measurements before sewing.
- Cut out the unit templates from the template pages before sewing, leaving about 1/8”-1/4” excess around the dotted seam allowance line.
- When cutting your fabrics, make sure each piece of fabric extends about 1/2” beyond the section it’s meant to cover. For example, when cutting fabric for A1, make sure the fabric extends 1/2” past the solid outline of A1 and into the neighboring sections and/or the seam allowance, if the section is adjacent to the seam allowance.
- Complete the individual foundation paper units in order numerically and alphabetically.
- For best results, shorten your stitch length and snip threads after each section for a neat finish.
- Backstitch at the beginning and end of each seam to secure it.
- Remember that on FPP templates, you will stitch on the solid line and trim the completed unit on the dotted line.
- When trimming each paper pieced unit, be sure that the fabric extends to the edge of the paper to secure your block with a 1/4” seam.
I want to call out a few notions from this week’s video. First, I have to give a shout-out to my absolute favorite fabric snips. The Sewline 5 1/2” Snippet scissors are hands-down my favorite snips. They are super sharp and very comfortable in my hand. They’re available in this handy Sewline Quilter Starter Kit, which comes with the Snippet scissors, several fabric marking tools, and fabric glue. It’s a great set and I use something from that set almost every time I sew.
When trimming the seam allowances on my FPP templates, I really like to use a smaller rotary cutter – this Fiskars 28mm rotary cutter is just the right size.
Are you ready to see our blocks?
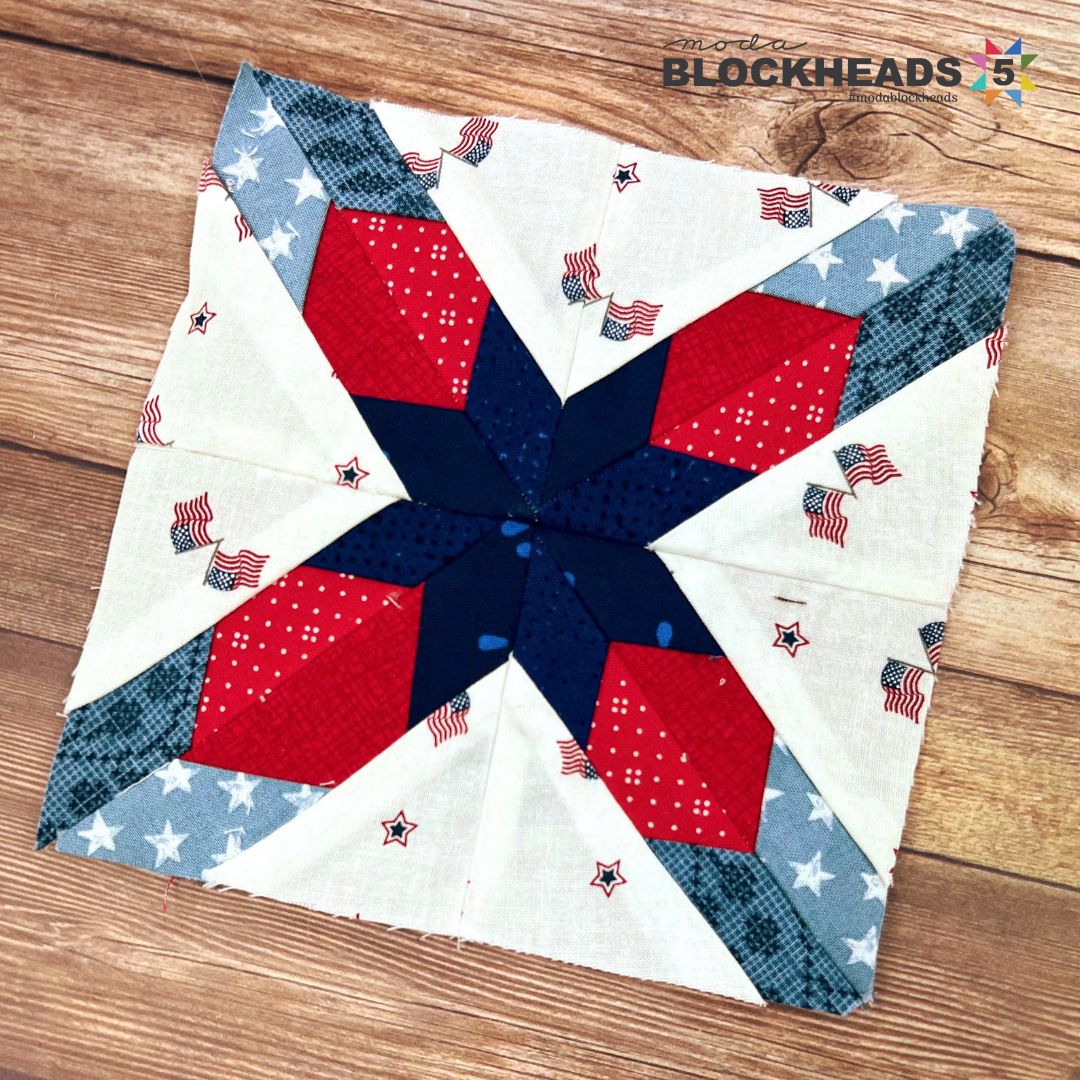
Alison is making a fall version in 12” blocks and a patriotic version in 6” blocks.
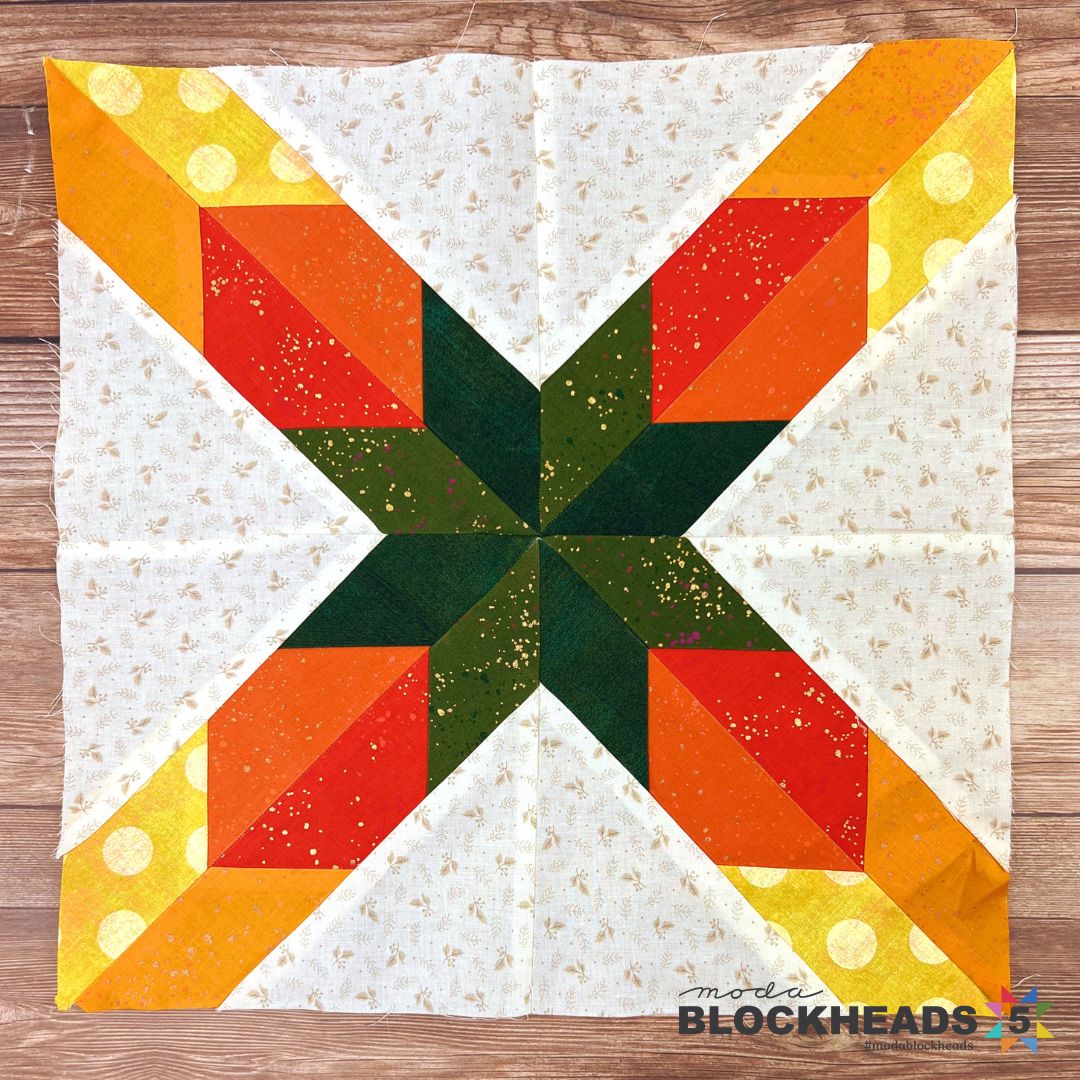
And I am making a traditional/repro scrappy fall version and a sweet/cottage-y Americana version in 6” blocks.
Now…off you go to press, cut, and sew! And don’t forget to share your blocks with us in our Facebook group or on Instagram (#modablockheads5)!
Posted in:
Comments