Welcome to Moda Fabrics!
Branching Out - A Block A Week
Branching Out - A Block A Week
Published:
Jan 7 2022 - 05:40
This started with an e-mail, and a somewhat grainy picture of a couple of quilt blocks from the 1930s.
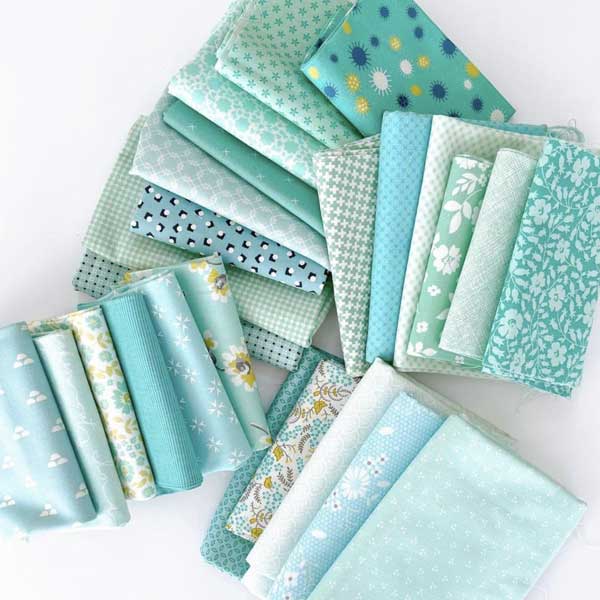
The blocks were in shades of faded blue, maybe aqua, but they were enough to give Susan an idea. And to pull the fabrics shown about for a quilt. Susan? That would be Susan Ache, acclaimed author and quilter, and known for having a lot of really good ideas on how to have a bit of quilting fun.
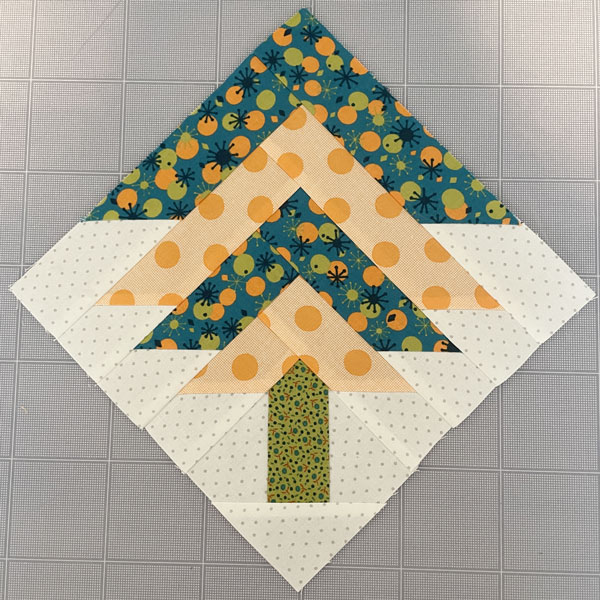
I was intrigued by the block as it was a bit different than other tree blocks I'd seen so I drew it up, and started making calculations. Then I checked Barbara Brackman's Encyclopedia of Pieced Quilt Patterns 3rd Edition, and the vintage block was probably made using the Old Chelsea Station Needlecraft Service pattern from the 1930s - No. 854 Pine Tree Quilt.
Our block has two notable differences, the length of the top row of branches are a bit longer, and the method of construction is log-cabin style. (As in, it's a bit easier to make.)
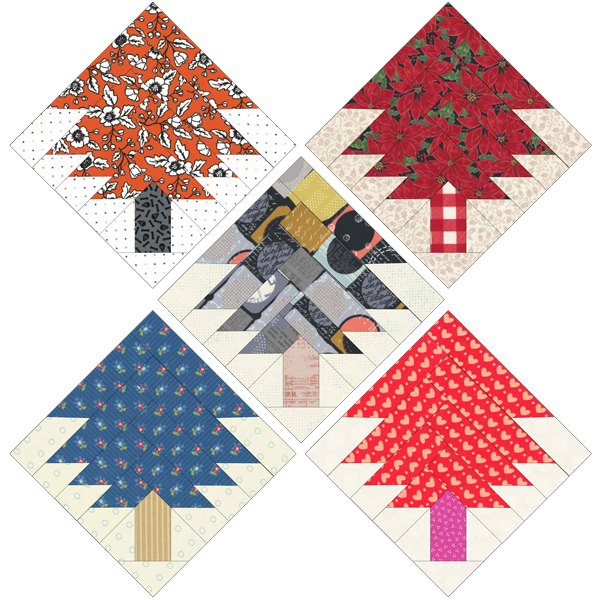
Digitally colored options to test the versatility of the block. Collections are Midnight Magic 2 - Home Sweet Holidays - Celestial - Newport - Sincerely Yours.
The second part of Susan's idea was to make a block or two a week, to have a project that could be worked on when we have just a little bit of time to sew. Done! I'm in.
Branching Out? Trees. Something different. A little bit of a different approach. And we both liked the name.
BLOCK PATTERN - Branching Out Instructions
A couple of things to mention before you make the blocks.
Make a test block. While it's always a good idea, a practice-run on piecing the trunk unit, getting the angle right on the flip-and-sew branches, and matching the angle on the first pair of branches will be time well-spent.
Block size. There are two sizes of blocks - the finished and unfinished sizes are provided.
- 8" finished - measures 8½" unfinished
- 6½" finished - measures 7" unfinished
Make a note of the measurement on the smaller block - it finishes at 6½", not 6". (I drafted the block, knew the measurements, and I still kept forgetting that.)
Block options. The original block was made using a single fabric for the branches of each tree, and all of the blocks used the same fabric for the tree trunks. That's one option, and each of the blocks shown above were colored that way.
I usually prefer something a bit scrappier.
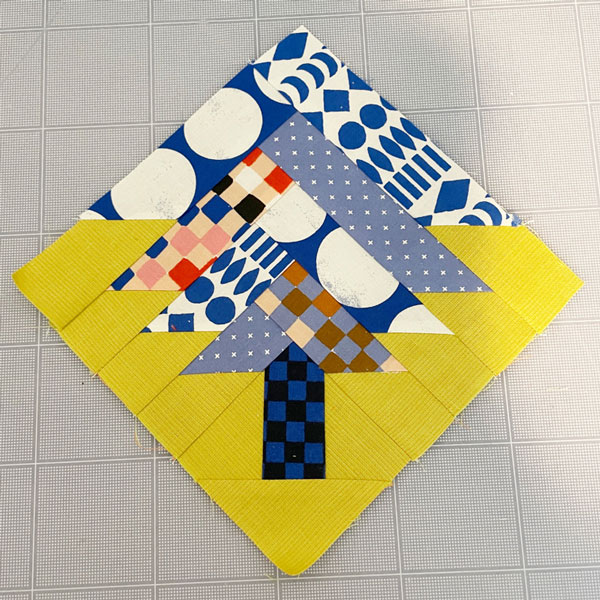
This is one of my 6½" test blocks. It's made with a Jen Kingwell Grainline Woven, and pieces of Ruby Star Society's upcoming Vessel.
Setting. This block lends itself to a diagonal setting, so when you're considering your background fabrics, remember to include some for the Side and Corner Setting Triangles.
- 8" finished block. Side Setting Triangles - cut squares 12¾", and cut each square twice on the diagonal to yield 4 triangles from each square. Corner Setting Triangles - cut 2 squares 6¾", and cut each square once on the diagonal to yield 2 triangles from each square.
- 6½" finished block. Side Setting Triangles - cut squares 10¾", and cut each square twice on the diagonal to yield 4 triangles from each square. Corner Setting Triangles - cut 2 squares 5¾", and cut each square once on the diagonal to yield 2 triangles from each square.
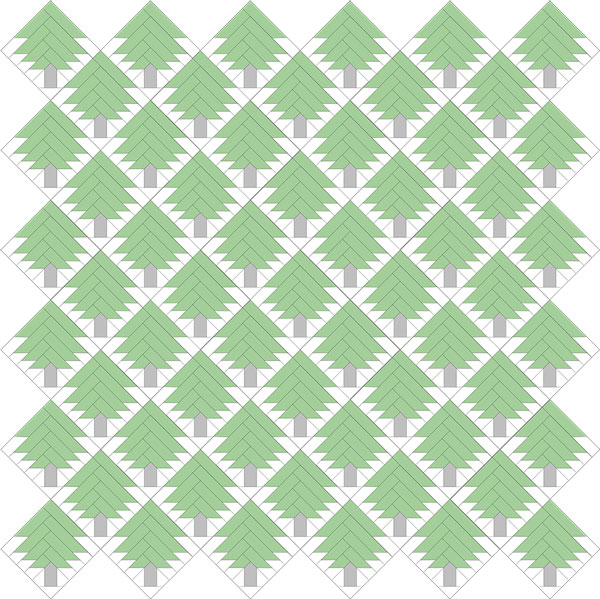
This would be the layout for 61 - 8" finished blocks.
Quilt Sizes.
- 8" finished block - Make 61 blocks for a quilt that finishes at approx. 67" x 67" without borders. The layout will have six horizontal rows of six blocks each, with pieced blocks in place of plain squares. Cut 5 squares for the Side Setting Triangles to yield 20 triangles. Cut 2 squares for the Corner Setting Triangles.
- 6½" finished block - option 1. Make 85 blocks for a quilt that finishes at approx. 64" x 64" without borders. The layout will have seven horizontal rows of seven blocks each, with pieced blocks in place of plain squares. Cut 6 squares for the Side Setting Triangles to yield 24 triangles. Cut 2 squares for the Corner Setting Triangles.
- 6½" finished block - option 2. Make 98 blocks for a quilt that finishes at approx. 64" x 74" without borders. The layout will have eight horizontal rows of seven blocks each, with pieced blocks in place of plain squares. Cut 7 squares for the Side Setting Triangles to yield 26 triangles. Cut 2 squares for the Corner Setting Triangles.
Yardage. How much yardage you'll need will depend on how many blocks you make, the size you make, whether the branches are scrappy, and so on.
Background - 8" finished blocks:
- 1 fat quarter will yield enough pieces for 5 blocks and one ½-yard piece will yield the pieces for 10 blocks.
- To make 61 blocks with a single background - 3¼ yards for the blocks. Add 1 yard for the Setting Triangles.
Background - 6½" finished blocks:
- 1 fat quarter will yield enough pieces for 7 blocks and one ½-yard piece will yield the pieces for 14 blocks.
- To make 86 blocks with a single background - 3¼ yards for the blocks. Add ¾ yard for the Setting Triangles.
- To make 98 blocks with a single background - 3¾ yards for the blocks. Add 1 yard for the Setting Triangles.
Two-color trees - this is one of my 8" test blocks.
Prints. Pre-cuts! This is perfect for Layer Cakes.
- 8" finished block. One Layer Cake square will yield the pieces for one complete tree. Just mix and match as desired - the branches in one print, the trunk in another print. Each LC square will yield 5 strips - 1¾" x 10".
- 6½" finished block. One Layer Cake square will yield the pieces for 1½ trees. Mixing and matching will be required for at least some of the blocks. Each LC square will yield 6 strips - 1½" x 10".
Honey Buns - the pieces for one tree block require 28" so three Honey Bun strips will make four blocks. At least one block would have to be scrappy.
Assembly. Piecing the block.
Use a scant ¼" seam throughout.
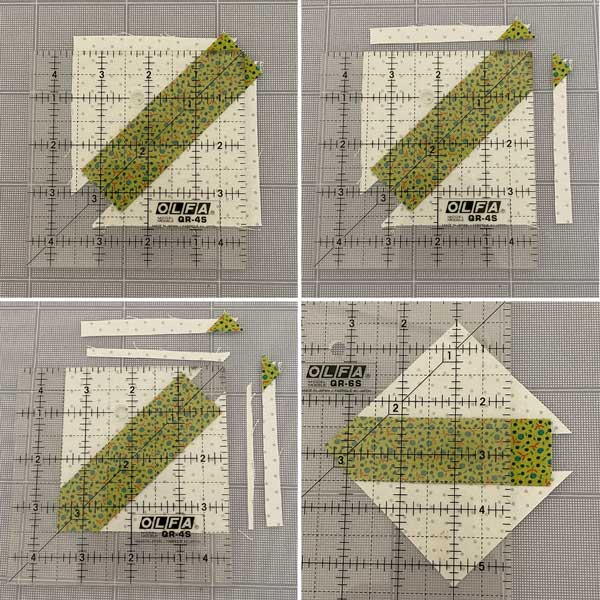
Diagram images are Row 1 - left to right, Row 2 - left to right.
When attaching the triangles to the trunk, line up the tip of the side triangle with the top of the trunk rectangle. A ¼" offset for the seam allowance isn't necessary as it will be trimmed off. Press the seams to the trunk - or press them open.
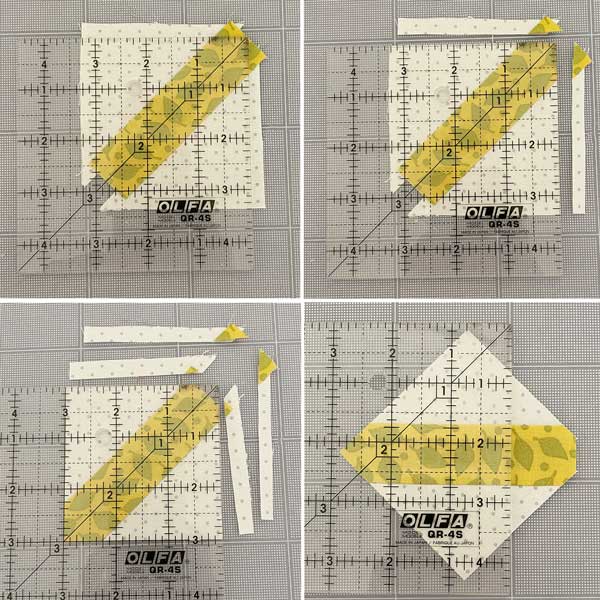
- Using a ruler with a 45° line, center the line in the trunk. Before cutting, make sure that the 3½" lines are on the fabric, that you'll be able to trim the square to 3½".
- Trim the corner as shown.
- Flip the unit and trim the remaining two sides.
- Turn the pieced unit as shown, then lay the ruler across it with the 1" lines of the ruler going across the opposing points.

- Trim the end as shown.
- Join the base triangle to the trunk and press the seam to the triangle.
- Trim the unit again to measure 3½" x 3½".
- Voilá. A trunk unit.
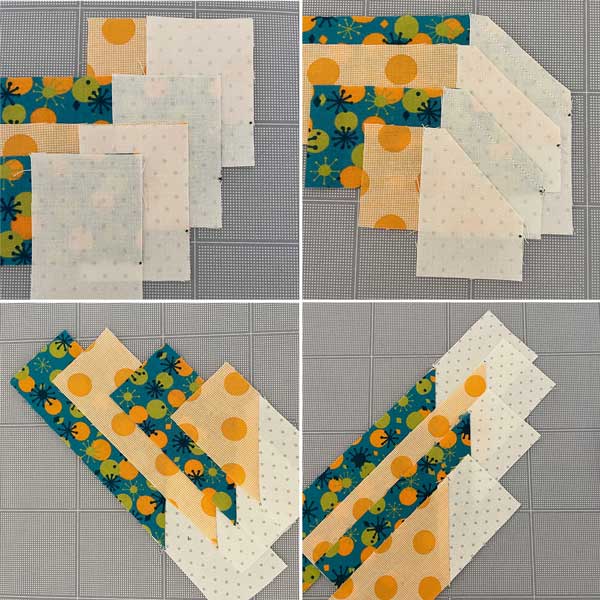
The branches - logs. Use your preferred notion or tool for connector/flip-and-sew corners. (I like Cluck Cluck Sew's Diagonal Seam Tape.)
Because the fabric placement and angle is the different for the two sets of branches, I recommend piecing branches 1 - 3 - 5 - 7 at the same time. (Shown in the first two images above.) Then piece branches 2 - 4 - 6 - 8. (This is where making a test block will help.)
- Place the background rectangle on the print rectangle as shown. Because there isn't a corner or junction to keep lined up, marking that point will make these steps so much easier.
- Stitch a 45° line across the end as shown. Before trimming, double-check the angle of the joined pieces! Trim the seam to ¼".
- Press the seams to the branch - away from the background.
- Piece the remaining four branches.
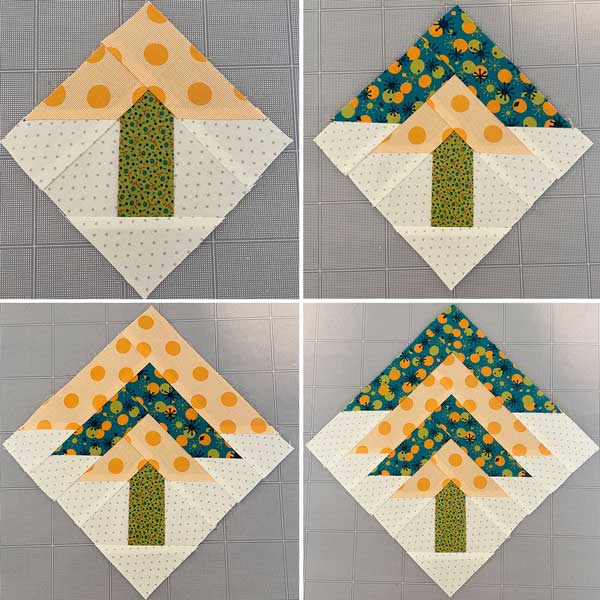
- Branches 1 and 2. Matching up the background edges and the seams on the branches and tree trunk, join the first two branches. Press the seams to the branch.
- After stitching, the seams on the branches and tree trunk should match up perfectly - and form a perfect 45° angle. (If you think all of mine were/are perfect... riiiight. Not. Those that weren't "close enough" were re-stitched.)
- Branches 3 and 4 - these are easy. Align the background edges and stitch. Press the seams to the branches.
- Branches 5 and 6 - keep going.
- Branches 7 and 8 - add the branches. Press. Done.
I chose to align the background edges of the block first to keep that edge straight, and help keep the block square.
The steps for the trunk unit are the same for the 6½" finished block, but the measurements are different, so...
- Using a ruler with a 45° line, center the line in the trunk. Before cutting, make sure that the 3" lines are on the fabric, that you'll be able to trim the square to 3".
- Trim the corner as shown.
- Flip the unit and trim the remaining two sides.
- Turn the pieced unit as shown, then lay the ruler across it with the ¾" lines of the ruler going across the opposing points.
Add the base triangle, and press the seam to the triangle. Trim the trunk unit to 3" x 3".
BLOCK PATTERN - Branching Out Instructions
So which size block are you making? And are you using one fabric for each block, or doing scrappy branches?
I'll be back next week with a few tips on how I'm going to plan/organize this project.
If you join the Branching Out fun, be sure to share your blocks with #modabranchingout. Maybe you can share your test block!
We'll be sharing blocks on Moda's social media, and Susan will be sewing along too - @yardgrl60 on Instagram. And me.
Have a great weekend!
For a PDF of this blog post - Branching Out - A Block A Week
Posted in:
Comments