Welcome to Moda Fabrics!
Ascend Quilt
Ascend Quilt
A note from Oda May: Today's quilt has two options! A wonderful modern version using a darling Christmas print from Deb Strain and a bonus Summer of {Bella} Solids option in a range of lovely, fresh colors perfect for summer.
Hi there! I'm Corinne and I blog over at www.mustlovequilts.com. I'm excited to share my first ever Moda Bake Shop tutorial with you!
1 Ho Ho Ho Jelly Roll by Deb Strain
1 White Bella Solids Jelly Roll
1/2 Yard Ho Ho Ho Print for Binding
3 3/4 Yards Ho Ho Ho Print for Backing
CUTTING INSTRUCTIONS
Print Jelly Roll
You will need 16 Strips from your print jelly roll. I separated mine by color into Red, Lime, and Green.
1) Take (11) Strips and cut down to 32.5”
(3) Red
(4) Lime
(4) Green
2) Take (2) Strips and cut down to 30.5”
(2) Red
3) Take (2) Strips and cut down to 28.5”
(1) Lime
(1) Green
4) Take (1) Strip and cut down to 26.5”
(1) Green
White Jelly Roll
You will need 30 Strips from your white jelly roll.
1) Take (15) Strips and cut them down to 41”
2) Take (5) Strips and cut them into (15) 12” units
3) Take (10) Strips and cut them per the diagrams below:
Take (2) Strips and from each strip subcut per the diagram below:
Take (2) Strips and from each strip subcut per the diagram below:
Take (2) Strips and from each strip subcut per the diagram below:
Take (2) Strips and from each strip subcut per the diagram below:
Take (1) Strips and subcut per the diagram below:
Take (1) Strips and subcut per the diagram below:
You should now have the following pieces cut out (All dimensions listed are the length, the width is 2.5”/the width of the jelly roll):
SEWING PREPARATION
Before we start sewing our pieces together, let’s pair them up so we can avoid confusion later on. I like to pin them together with a post-it label so that they don’t get mixed up.
1) First take all of your 41” strips and your 12” strips and set them aside.
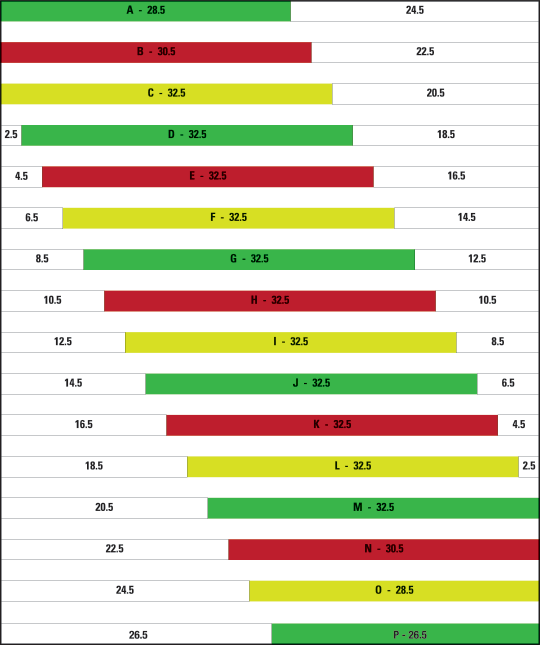
2) Below is the diagram of how the quilt is laid out. I’ve separated mine so that they alternate by color.

You will notice each row is comprised of a combination of white and print strips. Rows A, B, C, M, N, O & P are made up of (1) white strip and (1) print strip. The rest of the rows are made up of (2) white strips and (1) print strip.
Decide how you want to layout your strips and group your strips together based on their row letter.
For Example:
Row A is comprise of (1) 28.5” print strip and (1) 24.5” white strip. Take both of these strips and pin them together with a post-it or label marked “A.”
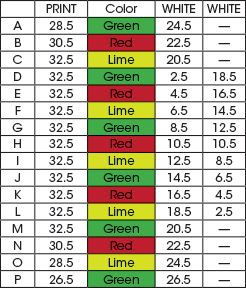
Here is a chart with how your strips should be paired up:
SEWING
1) First take your 41” and 12” strips you set aside earlier.
Sew (1) 41” strip to (1) 12” strip = 52.5” strip
You’ll end up with (15) 52.5” strips. These will be the strips between our print units.
2) Take your grouped units and sew the white strips to each end of the print strip. It doesn’t matter which end is which because you can just turn them “upside down”, unless you have directional fabric. Keep one of your labels with your strip so that you can easily put everything together. Here is Row E as an example:
3) Once you have all of your units pieced, sew your rows together per the diagram above.
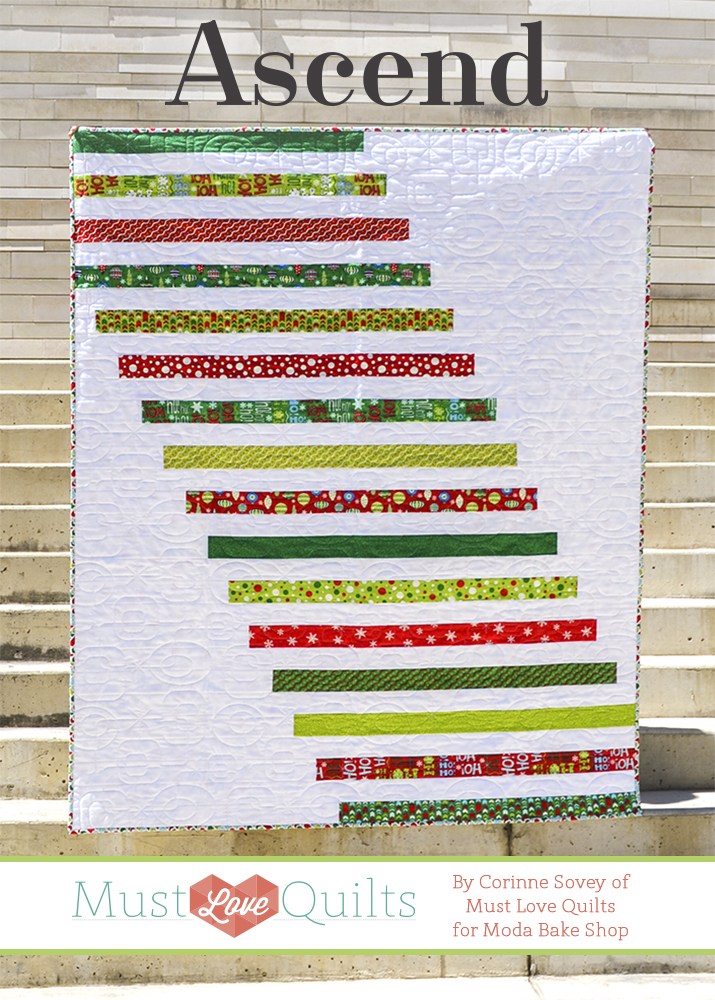
52.5" x 63" Quilt - The perfect comfort quilt sized just right for snuggling on the couch or under the Christmas tree!
Since this is the Summer of Solids, I went ahead and whipped up a Bella Solids version of this pattern. Please check out my blog, www.mustlovequilts.com, for details on what colors I used, and the piecing diagram for the solids version. I hope you enjoyed my first tutorial on Moda Bake Shop!
Until next time, Piece Out!
Corinne Sovey
{mustlovequilts.com}


